Hi everyone!
I’m so excited to be creating some pages ready for the festive season in my December album and today I have a project featuring the circles cardstock divider page from the Ivy Dividers pack.

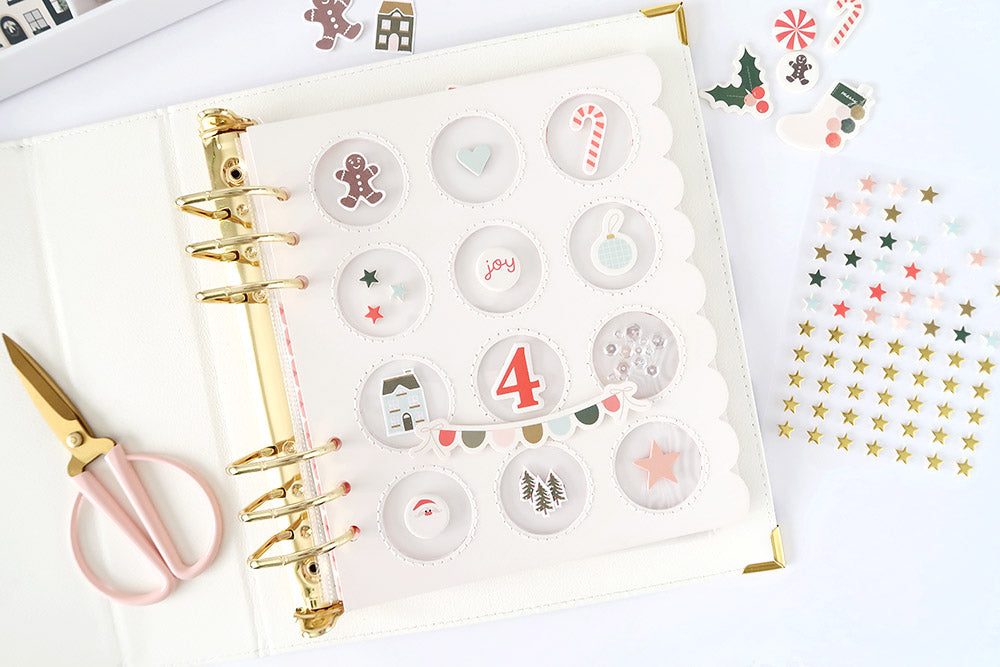
I love playing with pages like these! This one doesn’t have any photos or journaling because it’s going to be a decorative page in my album that will accompany another page that I create when December 4 comes around that will document the day.
I really wanted to make the circles like little clear windows which meant that I had to back the white divider page with acetate, but I also needed a second piece for the back to sandwich the acetate in between. Since I didn’t have a second cardstock divider with the same circle design, I went ahead and made one from patterned paper!

I cut a piece of the Candy Cane/Grid paper and cut it to 6.75” x 8.15”. It’s not quite as wide as the cardstock divider, but placed on the back, the scalloped edge will be visible down the side.

I then used the cardstock divider to trace the twelve circles on the Candy Cane side of the paper, then carefully used my craft knife to cut out each circle. To help smooth any uneven edges I used a small piece of sandpaper wrapped around my finger.

I cut a piece of acetate from my stash to fit in behind the cardstock divider and held it in place with some washi tape. For most of the circles I planned on adhering elements directly onto each side of the acetate but I wanted to encase sequins inside one of the circles. To do this I cut another piece of acetate to 2” x 2”, then attached it to the chosen circle with the sequins in between the two acetate layers. I added washi to each corner to hold it in place.
I chose not to use adhesive around the edge of the circle to secure the sequins inside because I was planning on stitching around the edge of each circle and I’ve found that using adhesive makes it a little difficult when stitching as the needle ends up coated with it. Instead, I added the paper page on the back held in place with washi tape, then pierced some stitching holes around the sequin circle and handstitched around the edge. For any stray sequins trying to escape while I stitched, I used a paper piercer to poke the sequins back into the centre of the circle. Once the border was stitched the sequins were secure and no longer moved around.


From there I went ahead and pierced stitching holes around the rest of the circles and handstitched those too.

To secure the ends of the thread on the grid side of the page I simply used a little dab of glue, then snipped off the excess. While the hand stitching on this page did take a while, it was worth it for the lovely texture it adds to the page and I love the end result!
Next was the most fun part…decorating each circle! For this I used a mix of Ivy Die Cut Shapes, Ivy Chipboard Flair, Ivy Cardstock Star Stickers, Ivy printables and fussy cut patterned paper shapes.

The gingerbread man and candy cane were from the Ivy Stocking Bundle Printable & Cut Files. I opened up the files in Photoshop, sized them to approximately 1” tall and flipped the images to create two of each element that could be placed back-to-back.

The heart and bauble are die cut shapes and already had a second one of each that could be place behind.
The chipboard star stickers and chipboard flair pieces could easily be placed back-to-back in their circles too.

At the bottom half of the page, you can see a blue house to the left of the number 4. This was cut from the Cottage paper and the pink house had the chimney on the opposite side which meant they could be place back-to-back.
For the back of the chipboard number 4, I cut some holly from the Floral paper. While it’s not the same shape as the number 4, it still covers most of the back of the number and I’m happy with how it looks.

Along the bottom row is another chipboard flair, some fussy cut trees from the Tree Farm paper and a die cut star which also had a mate to back it with.
To finish I added the die cut banner under the number 4 to help highlight it. I then punched the holes down the side of the page so it could be added into the album.


I love how this page turned out with all the cute little elements from the Ivy collection! I’m also happy to have this fun page already added to my album just waiting for a December story to tell.
I hope you’ve enjoyed reading about how I’ve put this together today and perhaps you’ve been inspired to create one for yourself? If you do, please be sure to share it with us on Instagram or on the FJ Facebook page. I’d love to see it!!!

Have a lovely day!
Sheree x

SUPPLIES: Ivy Kit | Ivy Die Cut Shapes | Ivy Paper Pack | Ivy Dividers | Ivy Chipboard Flair | Ivy Chipboard Numbers | Ivy Chipboard Star Stickers | Ivy Stocking Bundle Printables & Cut Files
3 comments
Absolutely beautiful!!! I’m going to try it.
SO, SO CUTE!!! Oh. My. Gosh. I JUST LOVE IT!!! I hope that I can find the time to make this!! THANKS SO MUCH FOR SHARING!!! I am going to miss all the ideas & the PRODUCT from this company!!! Take care.
This is beautiful and inspiring – thank u for sharing the process