April 2021 Sketch Challenge | Creative Team
Hi everyone!
It's Sheree here today with our new April sketch challenge! I had fun designing the sketch this month and I hope you enjoy it! Let's take a look...
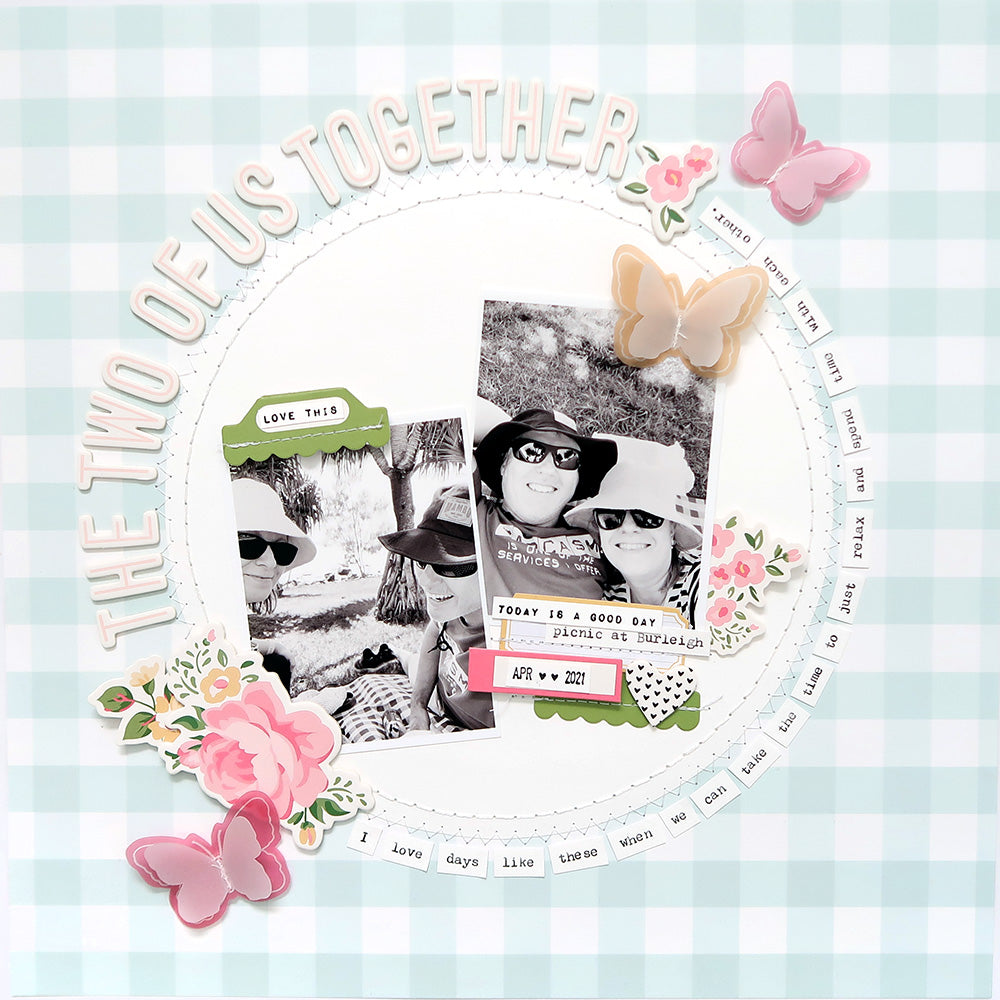
I went for a circular element right in the centre with a space for two photos right in the centre. You could use a photo with a journaling card or add more photos if you like too.
Here is how my layout turned out...

I chose the gorgeous plaid paper for my background as it reminded me of the plaid picnic blanket we were sitting on in the photos and I knew the colour would work so well with the elements from the Mari Kit. To create the white cardstock circle I used a plate from my kitchen as a template and simply traced around it with a pencil before cutting it out. I added hand stitching around the circle before adhering the circle to the centre of the page, then used my sewing machine to add some zig zag stitching as well. For placement of the title, journaling, florals, tab, labels and butterflies I followed the sketch quite closely, but added a few extras here and there. For the journaling I typed everything out using my typewriter and cut each word individually which allowed me to adhere them around the curve. I loved working with the circular element and it was so fun putting this layout together!
SUPPLIES: Mari Kit | Mari Die Cut Shapes | Mari Chipboard Shapes | Mari Layered Vellum Butterflies | Mari Stamp Set | Mari Designer Cardstock Tabs | Mari Chipboard Alphabet Stickers | Julia Paper Pack | Essentials Label Stickers No. 1 | FJ Roller Date Stamp
Some of our other creative team members have also joined in the challenge this month. They have put together some absolutely beautiful projects and I'm so excited to show you!
First up we have one of our newest team members, Shannon Dombkowski with her beautiful take on the sketch...

Here's Shannon to tell us all about her page...
I love the large circle design on this sketch so I stuck pretty closely to that. I opted to sew my circle for a subtle tone on tone look. When working with a sketch, I like to pull out a few key pieces to start with and then look away and finish up the page. Those few pieces here were the circle, two photos, butterflies, and title placement. The butterflies bring a fresh spring feel to the page, which is how I determined which photos to use and the theme for the whole page. After I had these base elements in place, I put away the sketch and finished up the page. I added a few elements that weren't on the sketch. The first is the layers behind the photos. I wanted to bring in some color and layering is perfect for that! I also wanted to bring in florals so I fussy cut a few flowers on the floral patterned paper. The second elements that aren't on the sketch are the border along the bottom and embellishment cluster at the top. I really enjoyed working with this fun page design and making it my own!

SUPPLIES: Mari Kit | Mari Layered Vellum Butterflies | Mari Chipboard Alphabet Stickers | Mari Designer Cardstock Tabs | Mari Stamp Set | Mari Paper Pack | Mari Die Cut Shapes | Mari Chipboard Shapes | FJ Roller Date Stamp
Next we have team member Ulrike Dold to share the gorgeous layout she has created using the sketch as inspiration...

Hi FJ friends!
The sketch challenge every month is one of my favorites and I hope you like my version of the beautiful sketch by the super talented Sheree!
I used the Bailey Papers "Grid & Love" and "Hearts & Plaid" and cut with my electronic die cutting machine circles in 9.5 and 7.5 inches. I glued the smaller one on the bigger one and added them onto a 12 x 12 inch piece of white cardstock. I used my sewing machine with white thread and stitched around both circles. I used my fingers to distress the borders of the circles a little bit. Then I added my two black and white pictures with 3 d dots on the circles to add some dimension. I added a mini wide paper clip in mint on one of the pictures, then I added two Grace Designer Tags in mint and black . On the mint one I added the date with the FJ roller date stamp. I always use for my date stamping the wonderful FJ roller date stamp with the hearts. Its one of my favorite crafting tools. For the title "You & Me" I used the wonderful Bailey Chipboard Stickers. I added the big flower die cut from the Brie collection on the left edge below on my picture. I used the Sarah Metal Dies, the Bailey solid cardstock and the FJ Essentials White Cardstock to make 3 wonderful round flowers. I backed the white flowers with the pink and mint solid cardstock from the Bailey paper pack and added them on the left side and on the right side on the top of my page. I also made three branches from the branch metal die of the Sarah collection and added them under the big floral die cut and under the big round flowers on the top. I wrote my journaling by hand around the big circle. I added the Grace die cuts "Friend" and "Day To Day" on the pictures and decorated the big circle on the right side on the top with the Grace die cut roses and the triangle die cuts from the Brie collection. I added some labels on the right side of the circle. The big letters are the first letters of my son and his stuffed dog and they are from the Lola collection. The big ampersand is from the Grace die cuts. I added more Bailey die cuts on my page: the small pink heart, the "love love love love love" stripe and the "Love Note" label. At the end I added the word stickers "Snuggle" and "July" from the Kate and the Jenny Word Stickers and splattered black ink across the page. I had so much fun working with these wonderful previous FJ collections in soft pastels colors.

SUPPLIES: Bailey Paper Pack | Essentials Miniwide Paper Clips - Mint | Bailey Die Cut Shapes | Grace Die Cut Shapes | Brie Die Cut Shapes | Sarah Die Set | Bailey Chipboard Shapes | Lola White & Black Polkadot Chipboard Alphabet Stickers | Kate Word Stickers | Grace Designer Cardstock Tabs | FJ Roller Date Stamp | Jenny Word Stickers
We also have new team member Laura Balboa with the lovely page she created...

My first sketch for FJ and I'm happy with the result. I have made a layout where the most important thing is: SMILE EVERYDAY. We have to always smile and enjoy the little things.
I have used paper and die cuts from the Julia collection and chipboard alphabets from the Mari collection. I hope you like it ❤️

SUPPLIES: Julia Paper Pack | Julia Die Cut Shapes | 6x6 Essentials White Cardstock | Mari Chipboard Alphabet Stickers
Now let's see how team member Jana Bennett used the sketch...

Hello everyone,
The sketch challenge is one my most favourite posts if not the most favourite! I love seeing how one sketch can be interpreted so differently. The CT girls always have amazing ideas and the best thing is when YOU share your take on the sketch! It is so lovely to see you creating with us!
The sketch Sheree put together for today is a marvellous one! I would always say yes to a circle composition. I love woodgrain design paper and I chose it for my background. Since I worked with a smaller format of layout (6x8 album) I had to change the circle a bit - by drawing just part of it. To mark the circle I always use a plate with convenient diameter. I had this idea to give that wonderful stamp set a go and went for a stamped image of the circle. The stamp phrases are easy to bend a bit to form the curve. I went for three lines and I separated the individual phrases with a little heart or a dot. I didn't have much room for the title (and the stamps are kind of substituting it) therefore I just used a die cut word and placed it with the photos. Once again I couldn't resist the beauty and I had to use few of those cute butterflies! They are so adorable and they will easily lift your layout to a different level.
I can't wait to see your beautiful creations. Please make sure you tag Felicity Jane sketch challenge in your post so we can see it!
Jana x

SUPPLIES: Mari Kit | Mari Paper Pack | Mari Stamp Set | Mari Die Cut Shapes | Mari Layered Vellum Butterflies | Mari Designer Cardstock Tabs | Mari Journaling Cards | FJ Roller Date Stamp
New team member Kerstin Scheidler has also created a wonderful project with the sketch...
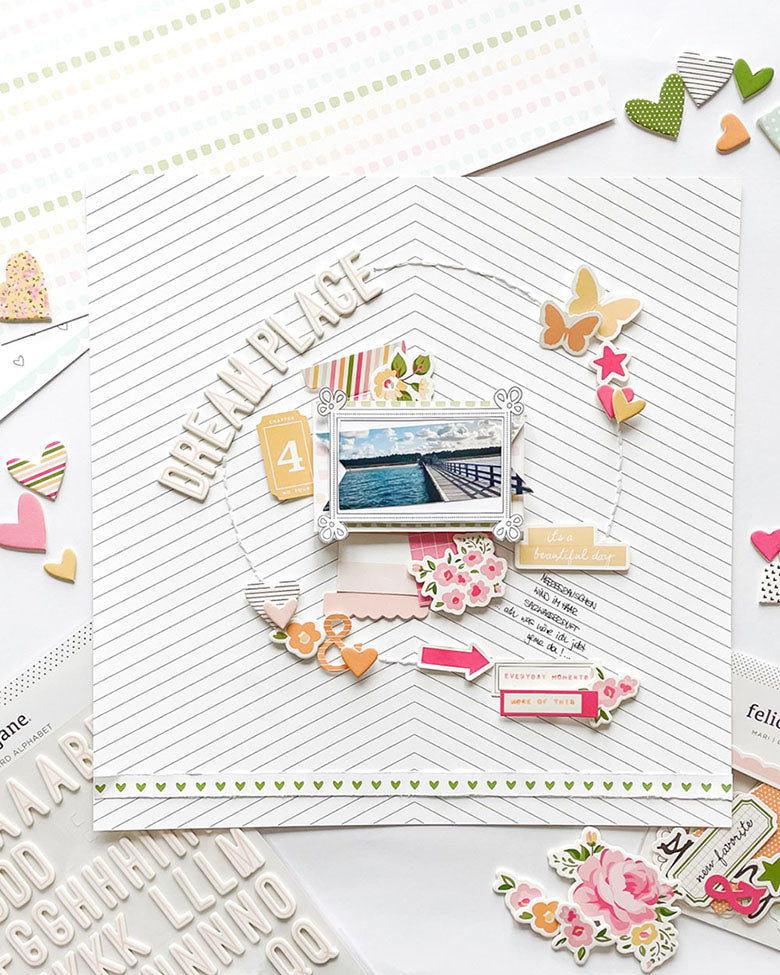
For this wonderful sketch I used the great Mari collection. I’m in love with the fresh and spring-like colors. This collection is perfect for me for a layout, with which I can dream about me on my "DREAM PLACE".
As a background I have chosen the paper "Chevron". In the middle I have raised small piece from the paper "Dotted Line" in the size of 4 x 2.5 inches. On it I have a frame that I cut from one of the adorable journaling cards, and backed it with white cardstock (top and bottom glued) so that I could slide in my photo. Under the raised section, I cut color matching journaling cards 1.5 inches wide and decorated with a cardstock tab and a floral die cut. Above my photo I also arranged a color matching cardstock tab and a floral die cut. To the left and right of my photo I added 2 more elements with 3D adhesive.
My title I have attached with the super cute alphabet chipboard stickers left above my photo in a slight bow. Then I drew a circle and arranged on it the various beautiful chipboard stickers. On the bottom right I stamped two tags with the versatile stamp set and decorated them with a floral die cut as well. To finish the circle I stitched the leftover lines with white thread. Finally, I cut the strip of paper with the green hearts and taped it down about 1 inch from the bottom edge. A little journaling and my take on the wonderful April Sketch was ready.
I have had much fun creating this layout and I’m happy how it turned out with this gorgeous kit!
I am already very curious what you create!
Kerstin xx

SUPPLIES: Mari Kit I Mari Paper Pack I Mari Chipboard Shapes I Mari Die Cut Shapes I Mari Chipboard Alphabet Stickers I Mari Journaling Cards I Mari Designer Cardstock Tabs I Mari Stamp Set
Last, but certainly not least, we have team member Lydia Cost with a fantastic take on the sketch in her notebook!

Sheree’s sketch included a genius circle, that I couldn’t wait to emulate into my A5 spread. It was originally planned for a 12x12, but it was so easy to adjust it to fit on my spread. Using my electronic cutting machine, I measured out the size of each page. I then arranged rectangular shape cuts (8 ¼ x 5 5/8) onto patterned paper, and I then overlaid a 7” circle on top. This cut the background perfectly to be glued onto my notebook spread. I created a little more dimension by running each piece through my sewing machine. I then began arranging my two photos on the right side. This left plenty of room for my “Birthday Party” title along my circle. I changed up the journaling position a bit, by placing it inside the circle, instead of along the edge at the bottom. I also chose to emulate the flower, using a large fussy-cut floral from the Mari patterned papers. Sheree’s sketch was super inspiring, and I know it will be perfect for any size of project I’m currently working on!

SUPPLIES: Mari Kit │ Mari Paper Pack │ Mari Chipboard Alphabet Stickers │ Mari Die Cut Shapes │ Mari Chipboard Shapes │ A5 Notebook - xoxo
We hope you've enjoyed seeing our different ideas and examples of how to use this sketch, and that we've inspired you to try the sketch too! We would love for you to join in the challenge! Be sure to share your work with us either on the Felicity Jane Facebook page or on Instagram using #fjsketch challenge. We're excited to see what you come up with!
Sheree x
