"Birthday Boy" Note to Self Binder Spread | Tiffany Julia
Hey everyone!
Tiffany here with a spread in my Note to Self binder documenting my best friend's birthday picnic. For this spread, I used bits from the Gabby and Tori kits, including one of the Gabby mini notebooks. While they were initially not a favorite of mine--as I had no idea what I would use them for--I realized that they are the perfect little books to add more photos or journaling to a project in a way that was cute, simple and not cumbersome. So handy!
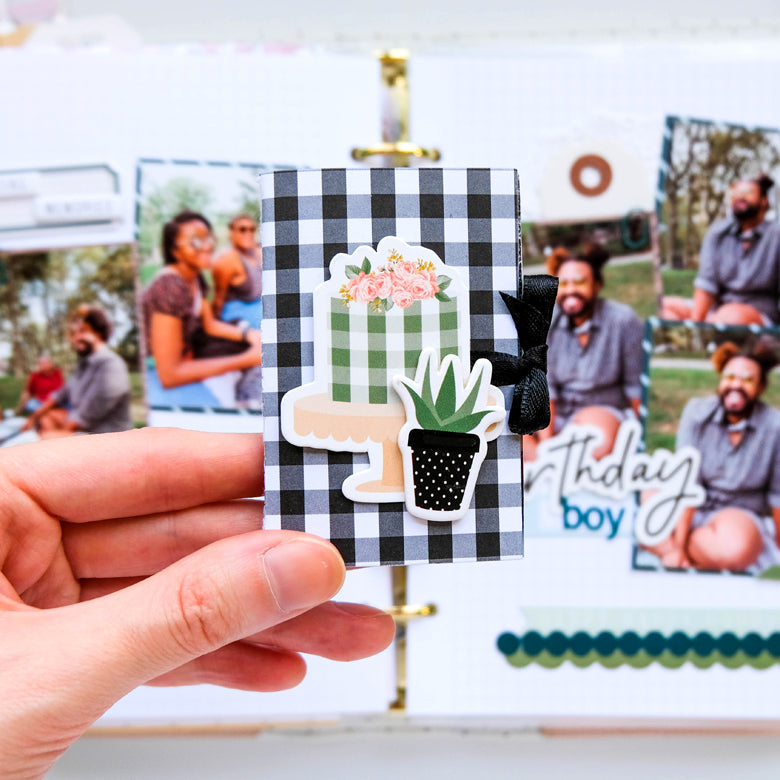
So I created this two page spread in my binder. Since I had a ton of photos I wanted to include, I chose all of my favorites from the day for the spread and included the rest in the little mini notebook, so not one photo went undocumented. I printed all of them out 2x3, because one, to get them all to fit on the two 6x8 page spread, and two, so they fit into the 2x3 mini notebook. 
I used my favorite vertical photos for the spread. I matted them all on some of the Gabby paper and layered them in threes on top of each other on both pages. For the left page, I layered two photos then the mini notebook where I've added the left over photos I wanted to have on the page. I tucked a white doily behind the photos and then embellished the page very lightly with a few die cuts and some of the Tori epoxy dots. I used a label piece from the Gabby kit for a bit of "journaling" and used two puffy stickers from Tori to write out "special memories."
For the mini notebook, I embellished the front cover with the cake die cut from Tori and the potted plant chipboard from Gabby. I tucked a bit of black ribbon on the front and back to use as a tie closure, because I ended up gluing in a lot of extra photos, which made the book a bit chunky.

I dedicated the right page entirely to my friend, who's birthday we were celebrating. I had these three photos that look similar but he's making a different face in each. These photos are matted on the same papers I used on the left and I layered them in the same way. I tucked another white doily and a tag behind them, and embellished lightly with photo corners, a mini paper clip from the Gabby kit, the Tori epoxy dots and a few heart chipboard pieces.

For the title, I used the "birthday" die cut from Tori and spelled out "boy" with the mini alphas from Gabby, which I put on top of a mint label sticker. At the bottom of the page, I layered a few border pieces on top of each other with the "happy happy happy" banner from Tori.
I'm quite pleased at how this spread turned out. It's super simple, but I'm happy I was able to include so many photos on one spread with the use of a mini notebook! Those books are so handy! They would be great to tuck into pockets for added photos and journaling as well.
I really hope this gives you an idea of how you can incorporate a mini notebook in your next project!
xxx Tiffany

SUPPLIES: Gabby Kit | Gabby Paper Pack | Gabby Die Cut Shapes | Gabby Chipboard Bits | Gabby Puffy Alphabet Stickers | Gabby Mini Notebook Set | Tori Die Cut Shapes | Tori Flexible Epoxy Dots | Tori Puffy Stickers | Essentials Miniwide Paper Clips - Autumn Teal | Essentials Label Stickers No. 1 | Note to Self A5 Grid Inserts | Note to Self Scalloped Blush Binder
