Creative Spaces | Kathleen Graumüller
Hey there lovelies! It’s Kathleen here again and today I want to give you a peek into my craftspace* :) I don’t know about you, but I absolutely love getting a glimpse into other people’s craft rooms; how they decorate them and how they organise and store their supplies!
*If you want to read through the whole post, get yourself a cup of coffee or tea, it’s gonna be a looong one :D
In our apartment before I actually had a whole room for myself that I could use as my scrap room. Not only did I have a lot of storage space, but I could also just close the door on my mess whenever I didn’t feel like cleaning it all up and putting everything back where it belonged.

In our new apartment, however, my craft space is in our living room. To give you a better idea of the layout of this room: it’s a big (but not huge), rectangular shaped room. On the one end there is the desk that I share with my fiancé and on the other end there is the actual “living room area“ with the sofa, coffee table and a shelf system in the back. That means you look directly at our work space when sitting on the sofa. And that also means: I need my craft space to be clean, organised, uncluttered and as nice to look at as possible ;)
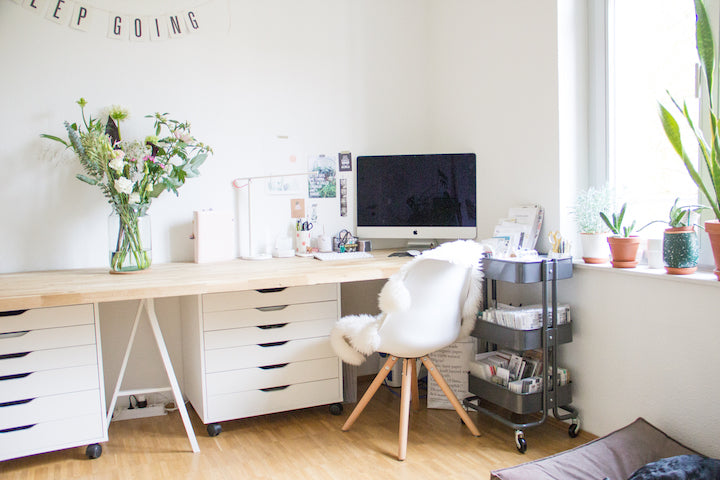
Our desk is actually a 3.4m long wood plank (like one that you would use for countertops) that we put on three white trestles from IKEA. He has the left part of the desk and I use the right one at the window (I need that as much daylight as I can for photographing my projects).

I only keep the essentials on my desk: my iMac, pens, a notepad, a little basket with random things like hand lotion, an eraser, bulldog clips.., my Felicity Jane Note to Self binder (it’s just so darn pretty so I want to see it all the time :D), a desk lamp and fresh flowers (I try to always have some!).
A clean work surface makes me happy and makes it easier for me to get started. I do make quite a big mess when I am working on projects, but when I want to start one, it needs to be tidy.
All of my most important things that I need when working on a scrapbooking project are within my direct reach when I’m sitting on my desk. To my right I have the craft room all-star Raskog cart, and underneath my desk I have the Alex rolling container from IKEA, my sewing machine, a zipper pouch with my paper scraps that I put on top of my Alex and a clear container with all my patterned papers.
In that I like to keep my current Felicity Jane kit papers and the bigger embellishment packages (like alpha stickers and other stickers) in the plastic bag so I can pull it out all at once.


Now let’s have a look what’s inside my Alex container:
- 1st drawer (not pictured): personal stuff, notebooks, pencil case, journal,
- 2nd drawer: my adhesives, roller stamps, embossing powders + heat gun, glitter tapes and glitter glue, all my washi tapes (yes, that’s all I own and it’s actually a few too many for my taste, but some are almost empty, so it’s all good) and my ruler

- 3rd drawer: my stamping drawer for ink pads, acrylic blocks, stamp cleaner, stamp platform
- 4th drawer: the two boxes on the right: one for photos waiting to be used and one for journaling cards, the two bigger clear containers for small embellishments like buttons, brads, badges, tassels, etc. and the two small ones for sequins
- 5th drawer: my mixed media-ish drawer (stencils, paint brushes, palette knives, gesso, embellishment mousses, glitter pastes.. and also cling and wood stamps)

And in the bottom drawer I have most of my tools like punches, 1-2-3 punch board, Crop-a-Diles, baby wipes, Fuse tool, Spellbinders platforms, and on top my Fiskars paper trimmer. I absolutely love having them all in one place, which makes it also really easy to put them back again when I’m done.
Now you might think, “looks great, but where do you have your actual scrapbooking things like embellishments and stickers?“. Well, that’s when the Raskog comes into play. The top tray holds all of the embellishments and stickers that I own (apart from the ones that I store in the 4th Alex drawer). Yes, that is all I have. I’m using small containers from Muji that I placed inside the tray to keep it organised.

In the big container on the left I have everything from enamel dots to phrase stickers to doilies and stickers. The ceramic basket is for random glittery things like ribbon, and some other bits and pieces. The one next to it is for die cuts and other loose things. I also have one for my wood veneer pieces, one for my small essential tools like scissors, stapler, cutting knife and then two for my Felicity Jane embellishments.
The one in the top row holds all of the small embellishments and journaling cards from the current kit (so right now it would be Mila). All of the pieces I still have from the collections before will be moved to the small clear container in the middle. I like having all of my small Felicity Jane items in one place so I can mix and match them when working on my Creative Team projects :) And they just coordinate so well with each other!

In the middle tray of the cart I have all of my spray paints and Thickers, and the bottom tray holds my card making items (left container) and clear stamps. I like to keep all of my Felicity Jane clear stamps in their packaging because that way they are really easy to spot and I actually love how sturdy it is!
So now that you’ve seen my desk and everything on/under/next to it, let’s have a quick look at the rest of our living room and how I incorporate my scrapbook things there:

Behind me on the window side of the room I have my (very lazy) little helper and a shelf where I can live out my crazy plant lady side ;) I also keep my 12“x12“ albums, my die storage album and my typewriter on there.
If you look further to the right (to the opposite side of the desk area), you see the sofa and our String shelf system (which is relatively empty at the moment because I’m in the middle of a huge purge).
The top board in the middle holds two boxes filled with mini albums, some more mini albums next to it, as well as the albums for my 8.5“x11“ layouts. I also like to keep my most favourite and recent mini albums on display.


And last but not least on the remaining wall we have a sideboard that contains some more craft/scrapbook items. Everything I have in there are things that I don’t need that often (like my laminator + MINC foils or my Silhouette Portrait) or items like replacement blades or adhesives. Apart from the Spellbinders Platinum die cutting machine, only three of the four compartments of this sideboard are used for scrappy things.


About a month or two ago I organised all of the things in there in boxes and containers and it has made such a BIG difference! Since I did that, I’ve used my MINC much more often because I only need to pull out that one container and I have everything I need to get started.
For me the way things are organised right now (and by that I mean in the Alex container, the cart, the sideboard etc.) is absolutely working out and it has made it so so easy for me to clean up my space after I’ve finished a craft project because everything has its place! So organisation and (some kind of) minimalism when it comes to what I have in my stash to me really is the key for a happy, functional craft space!
Whew… if you’ve made it through all of this text, you really deserve a medal! And even if you just looked at the photos, that’s fine, too. I can’t blame you :D
Anyway, I hope you enjoyed this (rather lengthy) post about my craft space and maybe could find some inspiration for how to store or organise some of your items! Thank you so much for stopping by!!
Kathleen