December Album Layout | Sheree Forcier
Hello FJ Friends!
I hope you all had a lovely Christmas with your loved ones! How are you going with your December documenting? I’ve been making sure I’ve taken photos and made a little note to remind me what to write about for each day and, now that the Christmas festivities are done, I can take some time to finish off my December album. I love revisiting what we’ve done throughout the month!
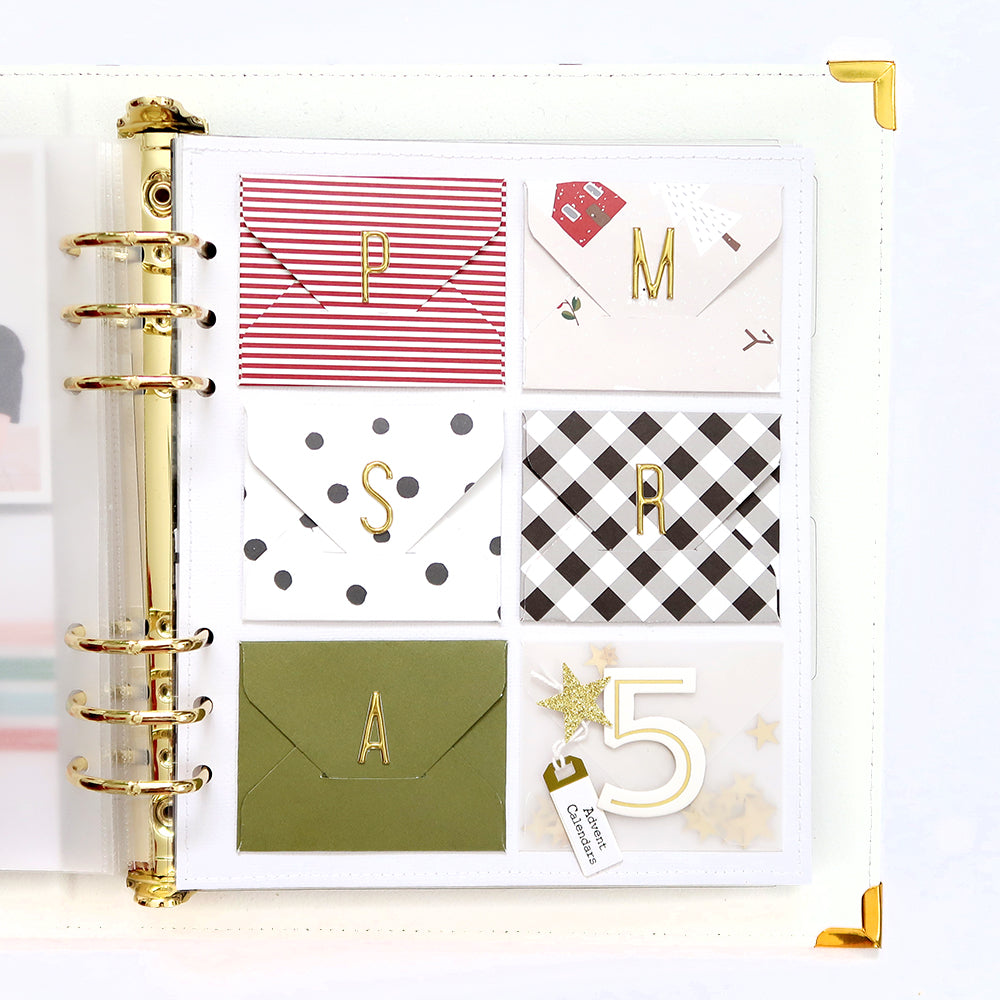
The page I’d like to share with you today is day 5 in my album and it’s all about our advent calendars! This year each one of us had our own calendar for the first time…so fun! It seemed appropriate that day 5 be about our five calendars.

I measured the size of the Felicity Jane page protectors from my 6 x 8 album and cut a piece of white cardstock to the same size for the background and punched the six holes down the left side. Machine stitching was added around the edge for a subtle border.

I used an envelope punch board to cut five small envelopes using various papers from the Noel Paper Pack and the Noel 6 x 6 Paper pack. The envelopes measure approximately 3 x 2 3/8 inches. I love that when you open these cute little envelopes you see a different pattern inside! I also cut one from vellum so I would have somewhere for the day number to go.

So that each envelope could be kept closed but still open easily, I cut a slit in the bottom flap of each envelope before adding any adhesive, so that the top flap tucks inside. I also added a gold foil letter to represent each of our names to each envelope. I used a very strong double sided tape to adhere each envelope to the page.

Inside each envelope is a photo of that person’s advent calendar with some printed journaling on the back.

For the vellum envelope, I used some vellum tape to adhere it to the page, and to seal it shut so that no adhesive is visible from the front. The envelope was filled with some gold confetti stars from my stash. The chipboard number was added to the front, along with a gold glitter star that I punched from some glitter cardstock, then I printed the words ‘Advent Calendars’, adhered it to a Noel Tiny Tag and attached it to the star with some twine. I love that the tiny tag hangs freely from the star!

You can see my process in the video below…
So that is day 5 in my album done! I already have my photos printed for day 6 with ideas running though my head. This is definitely one of my favourite projects to complete every year and it’s always so fun to look back on previous albums too!

I hope I’ve inspired you to add an envelope page to your December album project!
Thank you for stopping by the blog today! I look forward to seeing you here again in the new year with more ideas. In the meantime, I’d like to wish you all a very Happy New Year! I hope it will be amazing for you!!!
Sheree x

SUPPLIES: Noel Kit | Noel Paper Pack | Noel 6 x 6 Paper Pack | Noel Tiny Tags | Noel Chipboard Numbers | Harper Gold Foil Puffy Alphabet Stickers

1 comment
Love your page Sheree.