December Album Pop-Up Slider Page | Sheree Forcier
Hi everyone!
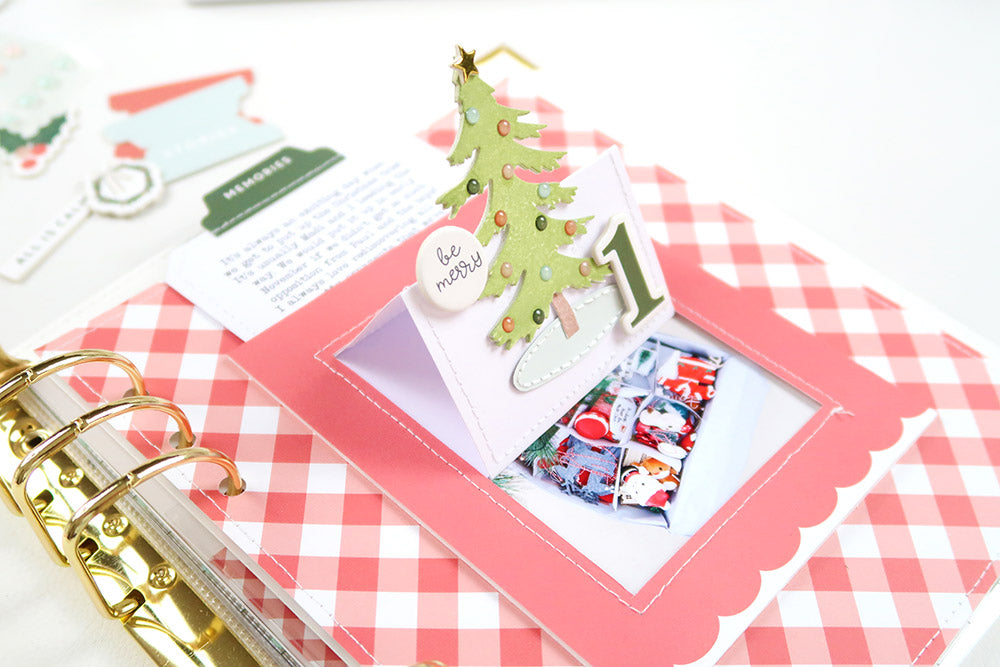
I’m excited to be sharing with you today, this fun pop-up slider page that I’ve created for my 2022 December album.

I’ve seen many different styles of pop-up slider cards over the years that I’ve always wanted to try but never got around to doing. Since I’m working on pages for my album, I thought I would have a go at making a fun, interactive page instead. I played around with some printer paper first to work out measurements before cutting into my patterned paper and cardstock. After a bit of trial and error I came up with the following…

For my background page I cut the Ivy Kit Gingham paper to 7” x 8.25” and stitched around the edge.
I cut a frame from the solid red cardstock from the paper pack leaving the scalloped edge at the bottom. The outside measurements for the frame is 4.5” x 5.5” and the inside measures 3” x 3 6/8”. I also added a stitched border.
I also cut a piece of white cardstock to 4.5” x 5.5” which will become the back of the frame a little later.

I printed a photo to 3.5” x 5”. (I’m using one from last year for the purposes of this blog post but will replace it with a photo from this year in December.).
I cut a piece of white cardstock to 3” x 5 7/16”. This will be the folding window that will reveal the photo underneath and pop up the Christmas tree. I scored this piece at the halfway point as well as 6/8” at each end. I stitched a border around the middle section that will be visible.
The last piece is for the journaling. I printed my journaling onto white cardstock, cut it to 3.5” x 4 5/8” then cut the top two corners to a tag shape.

I adhered the designer cardstock tab to the top and added some stitching.
With all the necessary pieces cut I was ready to put it all together!

First I adhered the photo to the middle of the 4.5” x 5.5” white cardstock piece.

Next I took the frame and flipped it over. I then took the folding window piece and adhered one end the top edge. You can see in the photo the way the scored folds sit.

I then took the journaling piece and tucked it under the other flap of the folding window piece, adhering it there with double sided tape.

I cut some thin strips of foam adhesive and positioned it down each side and across the bottom of the back of the frame making sure it didn’t touch the journaling tag at all. I then adhered the photo/white cardstock piece to the foam adhesive. (I apologise I didn’t get a photo of that step.)

Then it was time to decorate the front of the window. I stamped multiple images of the tree from the Christmas Tree Mini 3 x 4 Stamp in green onto white cardstock and used the coordinating die to cut them out.

I used liquid adhesive to layer four of them on top of each other which added dimension to the piece and also made it nice and sturdy. I stamped the tree trunk and cut it out to use.

I also cut a little oval from the light blue solid cardstock and stitched around the edge to create a little mat for the tree to stand on.
I arranged the tree onto the folding window, making sure to only use adhesive on the bottom half of the tree so that when the window folds open, the tree stands up.
I finished decorating with a chipboard number, the “be merry” chipboard flair, a gold foil chipboard star and some colourful epoxy dot stickers.

The finished piece was then adhered to the centre off the gingham background page and I punched six holes down the side so the page could be slipped into my album.

When you pull the journaling up using the tab at the top, the tree pops up and the photo is revealed…just like magic! Yay!
I hope I’ve inspired you to create your own pop-up slider page, or perhaps a pop-up slider card to send to a loved one this Christmas season.
Thank you so much for stopping by and have a wonderful day!
Sheree x

SUPPLIES: Ivy Kit | Ivy Paper Pack | Ivy Chipboard Flair | Ivy Chipboard Numbers | Ivy Chipboard Star Stickers | Ivy Flexible Epoxy Dots | Ivy Designer Cardstock Tabs | Christmas Tree Mini 3 x 4 Stamp | Christmas Tree Mini Metal Die Set | 6 x 8 Album

1 comment
Hi! I am just wondering. If or I guess when this shop closes, will the blog stay up so we can refer back to some of the information or projects we might like to use? Really love your products & ideas.
Thank you!