"February" My Memories Notebook Spread | Sheree Forcier
Hi everyone!
I’m super excited to share this new project with you today featuring the brand new My Memory Notebook!

This new size of notebook is a little larger than our A5 notebooks and at 9.5 x 7.5 inches for each page you have plenty of space to document whatever you like and the possibilities are endless!
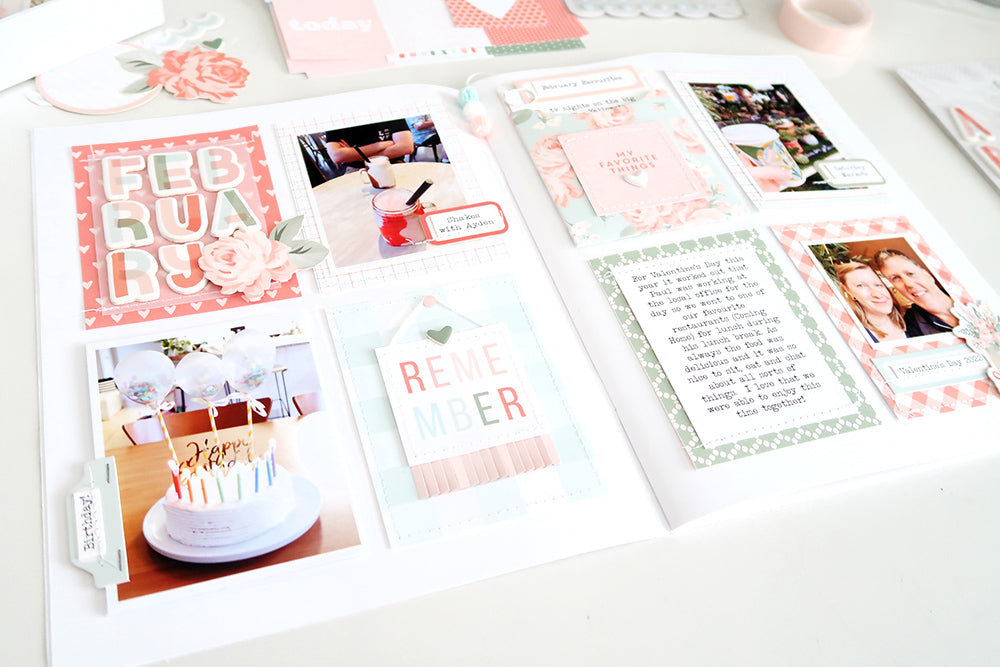
I’ve decided to use my notebook to create a spread each month about the everyday things happening in our family. One of the things I love about this new size is that you can comfortably fit eight journaling cards across the pages and of course I couldn’t wait to use the gorgeous Margot Kit for this project!

At the top of the first page I chose the hearts card and added a piece of vellum in the centre before machine stitching across the top and bottom. (My tip is to hold the vellum in place with a small piece of washi tape on each side before running it through the sewing machine. You can then easily peel the washi tape away.)
I used the Margot Chipboard Alphabet Stickers for the title “February” and I love this fun font! To finish this card I added a pretty floral die cut.

Next to the title card is a photo I’ve backed with one of the more subtle grid patterned journaling cards. I stitched a border and added a label to the side. I printed a little journaling to add to the label and stitched across it.


At the bottom left of the first page I’ve created a flip up using two 3 x 4 photos and some journaling. For the hinge I’ve used a folded piece of vellum which is adhered to the top of the back of the bottom photo and then folds up in between the photo and journaling flap on the top. (You can see this in the process video at the end of this post.) I also added a die cut tab to the side and adhered the printed “Birthday!” word into place before stitching across it and stapling it to the side of the flap.

Next to the flip up is a decorative card that I made using the pretty blue gingham card and one of the 2 x 2 inch squares from the 6 x 6 Cut Apart Sheets. I stitched a border around the card and the 2 x 2 inch square. Then I cut a piece of light pink paper from the Tori Kit and used fringing scissors to create a textural piece to tuck under the bottom of the “Remember” square. I also decided to make it look like a little picture hanging on the card by adhering a small piece of twine at the top. I used an epoxy dot to look like the hanger at the top and added a green chipboard heart sticker from the Aspen Kit.

At the top left of the second page I chose the floral Margot Library Card Pocket to hold a list of my February favourites. I cut the “My Favorite Things” square from the 6 x 6 Cut Apart Sheet and stitched a border before adding it to the front of the pocket. I also added a puffy white heart. I printed my list and used epoxy dots at the beginning of each item. I also added a pink label at the top with the printed title “February Favourites”.

I added the tiny tulle pom poms onto some thread using a needle, then tied it onto one of the white miniwide paper clips to add to the side of the journaling. (Since this pocket is at the top of the page, the pom poms can hang out of the top of the notebook and won’t create bulk inside when it’s closed.)

To the right is another journaling card with some subtle multi-coloured stripes which has a stitched border and another photo. I added a label to the side and stitched across that too.

At the bottom left of the page is more journaling. I backed it with a 3 x 4 inch piece of the green honeycomb paper from the paper pack and stitched across the top and bottom.
For the photo at the bottom right I cut a 3 x 4 inch piece of the gingham paper, then added my 2 inch square photo, a label and the die cut bunch of flowers. Stitching was added to this card too.

What I love about using journaling cards in this notebook instead of in pocket pages, is that you can have elements hanging off the side of the cards…so fun!
You can see my process in the video below...
I hope you’ve enjoyed seeing how I’ve created these pages today and that you will give the new My Memories Notebooks a try to document your memories too!

Thanks so much for stopping by! I hope the rest of your day is wonderful!
Sheree x

SUPPLIES: My Memories Notebook – Black Stripe – 2pk | Margot Kit | Margot Paper Pack | Margot Journaling Cards | Margot Die Cut Shapes | Margot Library Card Pockets and Labels | Margot Chipboard Alphabet Stickers | Tiny Tulle Pom Poms – Mint | Tiny Tulle Pom Poms – Blush | Tiny Tulle Pom Poms – White | Margot 6 x 6 Cut Apart Sheets | Essentials Miniwide Paper Clips – White | Aspen Chipboard Heart Stickers | Tori Flexible Epoxy Dots
