Fun Polaroid Tiered Pocket Page | Tiffany Julia
Hello everyone!
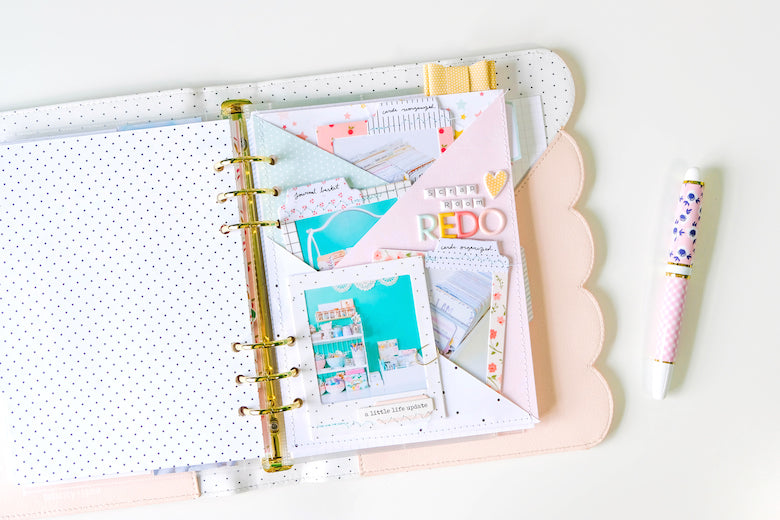
Tiffany here with a fun "pocket page" in my Scalloped Blush Note to Self Binder. I've been using my pretty pink binder to document in this year. At the beginning of 2020, I had every intention of returning to 12x12 pocket pages and layouts to recap my year, but since most of the year has been quarantined, I've been slowly moving the little memories I want to keep for the year into a smaller format.
For this page, I had a ton of photos of my little scrappy corner, which I took after I did a reorganization of the space. I had every intention of creating a traditional 12x12 pocket page, but since I'm housing 2020 in this binder now, I had to figure out a way to include all of my lovely photos. Since I had already printed them to be 3x3 squares, they were the perfect size to create fun polaroids using the gorgeous vellum frames, my favorite from the Katherine kit. And so that is what I did!
Before I did that though, I had to think of a way to display the polaroids in my binder. I instantly thought of putting them into pockets of some sort, so I decided to create a fun tiered pocket to house them all in.
I pulled out my top favorite pattern papers from the kit and cut them down to 6x8 pages. I used the fun star paper as the base for my "pocket page" and layered the others on top, making sure to cut a piece from each paper diagonally at the top. That way, when layered together, they create these fun tiers. I then ran them through my sewing machine to bind them all together into a three tiered pocket. I absolutely love how this turned out! I was able to get a lot of my favorite patterns showing on one page!
For the polaroids, I began by backing each of the vellum frames with some white cardstock. I really wanted the patterns on the frames to show through, so I glued them onto white cardstock, cut out the square in the middle of each, and then glued my photos into place. That way none of my photos show through the vellum; all you see is the lovely patterned frames!
I backed two of the polaroids with grid paper and the other two with pattern paper. I definitely took advantage of the backs of the polaroids to add a bit of hidden journaling because it’s always nice to have a lot of journaling on your pages, but to not see it. I personally don’t always like my handwriting, so this is a great way to hide it.

Once I had my frames done, it was time to embellish them. Since I was going to have them in pockets, I decided to use the tabs from the Grace kit on three of them. I figured this would make it easier to pull each photo out of the pockets. It gave me a way to label each photo as well. I then added a bit of mint blue stitching to each, which added a nice bit of texture to each tab.

For the forth photo, I decided to clip it to the outside of the last tiered pocket with a gold mini paperclip. I ended up using a few of the die cuts to embellish that frame and added some mint stitching as well.
As for the title of my page, I used some of my favorite puffy stickers from the Katherine and Lola kits. I absolutely love the alphas from this month's kit! I used them to spell out "redo," making sure to use a different color for each letter. I used the mini alphas from the Lola kit to spell out "scrap room," then added a yellow puffy heart sticker from the Katherine kit just to finish off the page.
I absolutely love how bright, colorful and interactive this page turned out! I love having things in pockets because it's so fun pulling everything out to see when I flip through my memories at the end of the year.
I made sure to film my process, so you can get a better idea of how this page came together. I really hope you enjoy and get some fun ideas on how to use those lovely vellum frames!
xxx Tiffany

SUPPLIES: Katherine Kit | Katherine Paper Pack | Katherine Vellum Frames | Katherine Die Cut Shapes | Katherine Puffy Stickers | Katherine Puffy Alphabet Stickers | Grace Designer Cardstock Tabs | Lola Mini Puffy Alphabet Stickers | Miniwide Paper Clips - Gold | Note to Self A5 Grid Inserts | Note to Self Binder - Blush Scallop
