Happy Day Christmas Scrapbook Page | Ulrike Dold
Hi FJ friends,
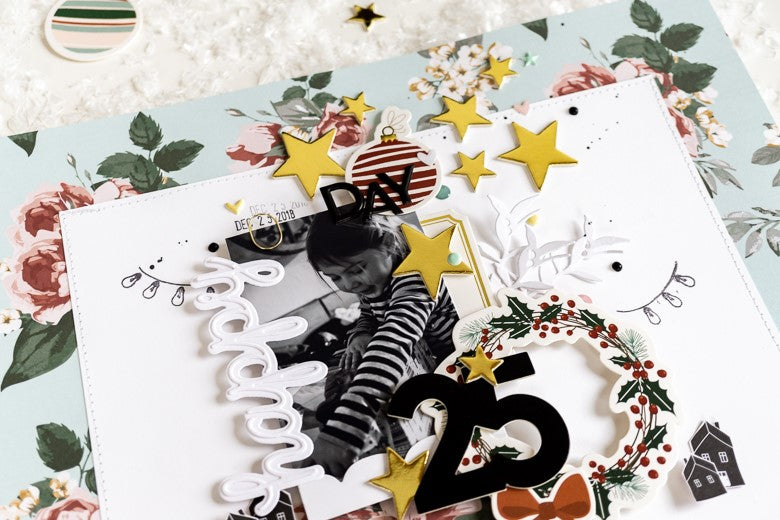
Ulli here with you with our Friday favorites on the FJ blog. When I went through the wonderful Coco Christmas kit I directly fell in love with the blue floral patterned paper with the red roses and the one with the little houses. I am also totally in love with the gorgeous Coco Die Cut Shapes, especially the Christmas ornaments. So I began to make a scrapbooking layout with these pretty paper things. Here you can see my whole page.

First I cut the Essentials White Cardstock to 9x9 inches. Then I used the gorgeous floral paper "Flowers & Dotty Stripes" and cut a big frame with about 2 inches wide on each side and glued the white cardstock centered on it. You could also glue the smaller cardstock directly on the paper, but I wanted to have some leftover from this pretty floral paper sheet. Its too pretty waste. Then I used my sewing machine and white yarn and stitched around the border of the white cardstock.

I used the scalloped white part of the Coco die cut packaging and glued my picture into it. Then I cut everything a little bit smaller. I added the picture with 3D dots on my page to add some dimension. Then I fussy cut one of these wonderful roses of the "Flowers & Dotty Stripes" paper and added it under my picture. I used the wonderful Coco die cuts and began to decorate my page from the left side of the bottom to the right side above. I’ve used all the circle elements and the sweet red striped Christmas ornament. I also added some 3D dots here and there. I glued the sweet wreath on the right bottom of my picture and added there one of these wonderful black Coco chipboard numbers for the date when the picture was taken. I used one of those wonderful labels from the Coco Label Book in gold and glued it under my picture and under the wreath too.

I fussy cut four of the super cute little houses of the "Lattice & Houses" paper and added them on the right and the left side between the picture. I added a cute miniwide paper clip in gold on the top of my picture and used the beautiful new gold chipboard stars and added them between all the die cuts. I love the glamorous look of so many gold foiled stars. They look amazing when you cluster them!

For the title I’ve used the Essentials White Cardstock and the adorable Sarah Metal Die. I added the word happy on the left side vertical on my picture. I also made some branches with the Sarah Metal Dies and the FJ cardstock and glued them under the gold foil label and under the wreath with the red bow. For the second word of the title I used the pretty black Coco Puffy Alphabet Stickers and added the word "day" on the red Christmas ornament. Then I stamped the little chain of lights from the adorable Coco Stamp Set on the left side and on the right side of the scrapbook page. For that I’ve used a black ink pad. Aren´t these little light bulbs super cute!?

At the end I splattered black ink across my page and finished off my page with some Brooke Puffy Stickers in yellow and mint, some Tori Epoxy Dots and Bailey epoxy hearts. I love to add these sort of embellishments in the end and do it often. They give every page a playful and sweet look. I also added some of the black dots from the Coco Puffy Alphabet here and there.

I hope you had fun reading my blog post and maybe I could inspire you to make a wonderful scrapbook page with the gorgeous floral Coco paper too.
I will be back in January and so I want to wish you all a wonderful Christmas! Take care of you and your families, stay healthy and see and feel the love which is all around us! Its the most wonderful time of the year and I hope every family will feel the magic through this world wide pandemic this year. And thank you for stopping by today.
xx Ulli

SUPPLIES: Coco Paper Pack | Coco Die Cut Shapes | Coco Chipboard Numbers | Coco Chipboard Stars | Coco Stamp Set | Coco Label Book | Coco Puffy Alphabet Stickers | Essentials Miniwide Paper Clips - Gold | Brooke Bitty Puffy Stickers | Sarah Die Set | Bailey Epoxy Stickers | FJ Roller Date Stamp | Essentials White Cardstock | Tori Flexible Epoxy Dots
