"Hello" Traveler's Notebook Spread | Sheree Forcier
Hello Friends!
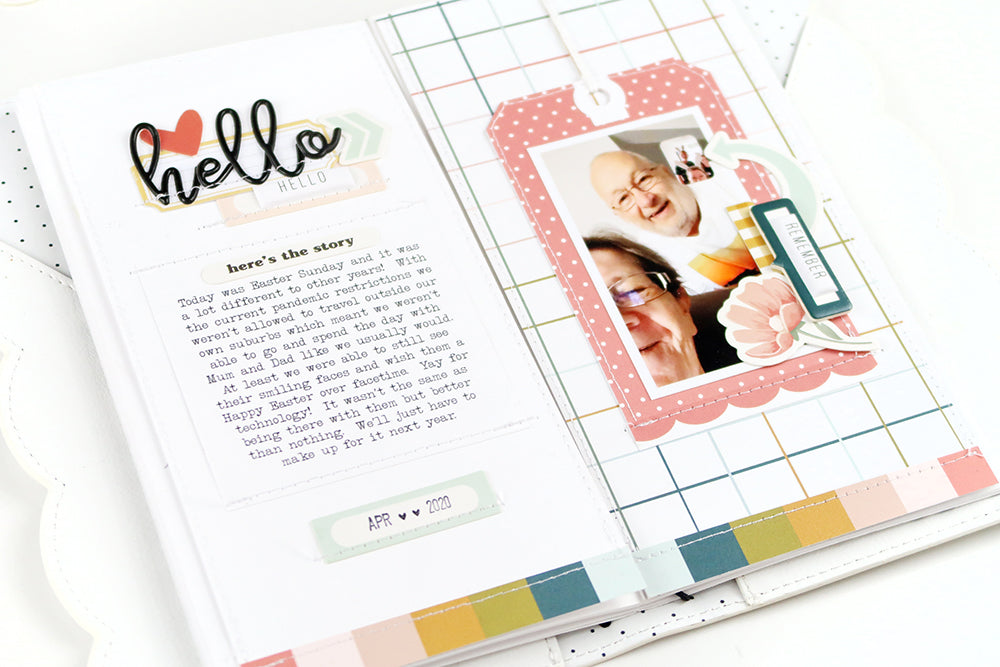
Today I have a new traveler’s notebook spread to share with you featuring the beautiful Gabby Kit! I always enjoy working in this format and I love these smaller sized pages for documenting everyday moments that I wouldn’t necessarily create a 12” x 12” layout for.

The photo for this spread was actually a screen shot that I took while on a facetime call to my parents on Easter Sunday this year. We were unable to go and visit them like we usually would due to pandemic restrictions, so this was something I wanted to document.
I like to create my traveler’s notebook pages outside the notebook first so that I can add details such as stitching and staples. I cut the first page from Essentials White Cardstock and the second from the “Wonky Grid” paper from the kit. For the multi-coloured strips across the bottom of each page I used the reverse side of one of the bonus 4” x 6” cards from the paper pack. I simply trimmed a strip from each end of the card so I can still use the quote on the other side for another project. I stitched around the border of each page and across the strips along the bottom.

I decided that the first page would be for my title and journaling. I layered a yellow Essentials Label Sticker and a Gabby die cut label together as the base for the title, then I used the Megan Puffy Alphabet Stickers for the first “hello” word and a Tori Puffy Sticker for the second. I stitched across each label, then added a heart and arrow die cut to the cluster.

I printed my journaling onto some 6” x 6” Essentials White Cardstock, cut it out, adhered it into place and stitched around the edge. The “here’s the story” die cut that I added above the journaling was from the Tori Kit.
Under the journaling I adhered another die cut label, stamped the date using the FJ Roller Date Stamp, and added stitching across the bottom as well.

For the second page I cut a tag shape from the “Swiss Dot” paper and added a white cardstock hole reinforcer piece that I cut with the Shay Tag Builder Metal Dies. I stitched around the edge of the tag before adding the photo and twine. The tag was adhered into place and I stapled the twine to the top of the page. The scalloped edge that I positioned across the bottom of the tag was cut from the paper pack packaging strip and stitching was added to that too.

To the side of the tag I added a die cut arrow, yellow gingham tab, a chipboard label and die cut flower. The “remember” puffy sticker was from the Tori Kit.

The pages were then adhered into my traveler’s notebook insert inside my Note to Self Scalloped Traveler's Notebook.
I have a process video below if you'd like to watch how I put it all together...
I love the colours in this kit and I’m so happy with the end result!

I hope you’ve enjoyed seeing how I’ve put this project together. Thanks so much for stopping by the blog today!
Sheree x

SUPPLIES: Gabby Kit | Gabby Paper Pack | Gabby Chipboard Bits | Gabby Die Cut Shapes | Megan Puffy Alphabet Stickers | Tori Puffy Shapes | Tori Die Cut Shapes | Essentials Label Stickers No. 1 | 6x6 Essentials White Cardstock | Essentials White Cardstock | FJ Roller Date Stamp | Shay Tag Builder Metal Die Set | Traveler’s Notebook Insert | Note to Self Scalloped Traveler’s Notebook
