July 2022 Sketch Challenge | Creative Team
Hello crafty friends!
It's Sheree here with you on the blog today. I'm always excited to share a new monthly sketch challenge with you and today is that fun day of the month! This design I've come up with allows for anywhere from 1 - 4 photos and I can't wait to see what you all do with it! Let's take a look at the sketch...

Here's the layout I created with the sketch...

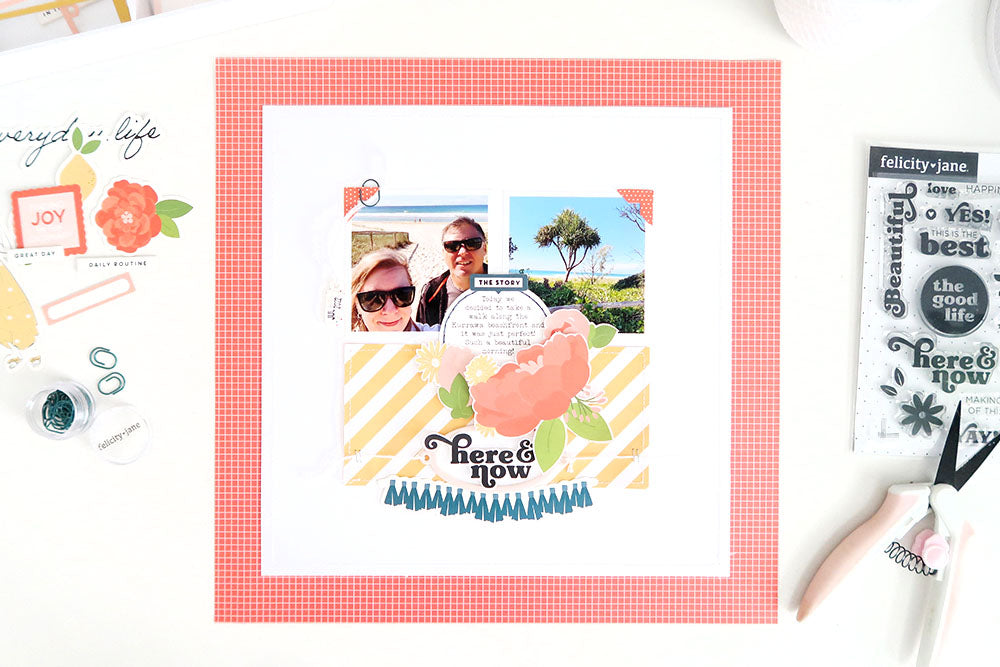
I used beautiful products from the Emma Kit to create my project. I chose the poppy coloured grid paper as my border and added my 10” x 10” white cardstock to the centre. I decided on two photos for the top two squares in the sketch grid, then went with a patterned paper strip to replace the bottom two squares.
I printed my journaling onto white cardstock then used a 2 ½ inch circle punch to cut it out before hand-stitching around the edge. Once the journaling was placed in the centre I decorated with fussy cut florals and a stamped fussy cut label.
I used the pretty oval chipboard bookplate as a home for my stamped title and added the die cut banner at the bottom. I finished by using a chipboard tiny tag for the date attached to the top left photo using a miniwide paper clip. This layout was so fun to put together and I love the mix of colours!
SUPPLIES: Emma Kit | Emma Paper Pack | Emma Die Cut Shapes | Emma Chipboard Bookplates & Brads | Ginny Stamp Set | Abigail Stamp Set | Annie Tiny Chipboard Tags | 12 x 12 Essentials White Cardstock | Essentials Miniwide Paper Clips
Of course we have some absolutely gorgeous and inspiring projects from our creative team to share with you too! First up let's see how Elena Martinelli has interpreted the sketch...

Hello FJ Friends! Elena here sharing my take on this month's challenge.
How not to be inspired by this amazing sketch? To make my layout I cut six tags to bring a modular grid.
I used Chipboard Bookplates & Brads to create the first title and Chipboard Alphabet Stickers for the second. Around the round picture I decorated with die cuts and some enamel dots.
The Emma Collection is full of colors and energy - I hope you feel inspired and you like my version of the July sketch ;)
Thanks for stopping by the blog my friends
Elena

SUPPLIES: Emma Kit | Emma Stamp Set | Emma Paper Pack | Emma Chipboard Alphabet Stickers | Emma Die Cut Shapes | Emma Chipboard Word Confetti | Emma Chipboard Bookplates & Brads | Abigail Flexible Epoxy Dots | Abigail Puffy Alphabet Stickers
Next up we have Ulrike Dold to share her pretty layout with us...

Hi FJ Friends!
I had so much fun with the gorgeous July sketch made by my talented team mate Sheree and so my layout came together:
I used the FJ summer photo prompt "In The Sand" for my layout and found pictures from our beach ball sessions on the beach this June at the Netherlands. For the layout I’ve made a 2 inch wide frame of the wonderful Emma "Floral & Plaid" paper and cut white essentials cardstock to 10.5 x 10.5 inches. Then I glued the cardstock on the frame. I´ve used my fingers to distress the border of the cardstock a little bit. I used white cardstock and a circle metal die of 2.5 inches and made the circle shape for my journaling. I used two little pictures because I didn’t have a series of 4 pictures, but I love to change sketches a little bit. I punched a little hole on a picture and used the label in white and yellow from the Emma Die Cuts and knotted it on my photo with black yarn, then I’ve made a bow on it.
I added the wonderful Kayla die cut roses on the circle shaped cardstock and wrote my journaling on it after I made some lines on it. Then I’ve added it in the middle of my layout and on the bottom of my two pictures. I added the title "Beach Ball" with two different FJ alphabets and I love how they look together. The pink vellum alphabet of the Kayla collection looks so great together with the Emma Chipboard Alphabet in blue with the tiny dots.
I added some labels on my layout and used 3D dots to add dimension. I used the pretty and cute Emma Chipboard Word Confetti and added them here and there. I also used Kayla Die Cut Shapes and Kayla Chipboard Bits to decorate this page, and of course the Emma Die Cuts too. I used the Kayla stamp set to add some summery quotes and I also used the Emma Stamp Set to add two arrows on the left side of my title. I stamped the date when the pictures were taken with the FJ Roller Date Stamp under my title.
I added a pinkish wide paper clip on the right picture and splattered black ink across my page. At the end I added Brooke Puffy Shapes, Aspen Chipboard Heart Stickers and a Millie Heart Sticker on my page.
I hope you like my layout and I could inspire you with it to create something with this sketch too.
xx Ulli
 SUPPLIES: Emma Kit | Emma Paper Pack | Emma Die Cut Shapes | Emma Chipboard Word Confetti | Emma Chipboard Alphabet Stickers | Emma Stamp Set | Kayla Die Cut Shapes | Essentials Vellum Alphabet Stickers - Peony | Kayla Chipboard Bits | Kayla Stamp Set | Aspen Chipboard Heart Stickers | Millie Puffy Heart Stickers | Brooke Puffy Shapes | Essentials Miniwide Paper Clips - Pinkish | FJ Roller Date Stamp | 12 x 12 Essentials White Cardstock
Valeska Guimaraes has also been busy creating with the sketch! Here she is to tell us about her lovely work...

Hello FJ friends,
Valeska here with you sharing my version of the beautiful July sketch made by Sheree.
I chose to use the vacation spot from the Summer Photo Prompts and created a layout to document this beautiful day!
I made a double border for my layout with the pretty "Heart and Swiss Dots" paper and the red solid paper from the Emma Kit. I cut my white cardstock to 10”x10” and stitched with white thread in the red border.
I cut two tags from the "Stars and Tags" paper and placed them on my cardstock in diagonal with my two photos already backed with the red paper. All four elements were placed on the middle of my white paper.
On the center, I cut flowers from the flower paper, made some rosettes with "Gingham" paper and "Grid and Chevron" paper and placed a die cut shape with word confetti on it. I decorated all the tags with flowers and die cut shapes as well!
Hope you enjoy it and create with us using the summer photo prompts.

SUPPLIES: Emma Kit | Emma Paper Pack | Emma Die Cut Shapes | Emma Chipboard Alphabet Stickers | Emma Chipboard Word Confetti
Next up we have Karlla Dauer to tell us about the fun layout she put together with the sketch...

I love sketches with grids. For this layout, I positioned my photo as the main detail of the project and worked with several embellishments in different dimensions. I used the 6x6 paper pack for the grids. Hope you like it.
 SUPPLIES: Emma Kit | Emma Paper Pack | Emma 6x6 Paper Pack | Emma Chipboard Alphabet Stickers | Emma Chipboard Word Confetti | Emma Die Cut Shapes
Kerstin Scheidler also has a beautiful page to share. Here she is to tell us about how she put her own spin on the sketch...

Hi everyone! It’s THE time of the month – Sketch Challenge Time! Sheree has come up with another amazing sketch! I love being creative with sketches because I can play with the awesome Felicity Jane kit without worrying about a layout.
For this sketch, I put the focus on the circle in the middle for me.
I used papers from Emma and Kayla. I cut the Emma "Plaid" Paper and the Kayla "Dotted" Paper each to the size 4 x 8 inches and sewed all the way around with my sewing machine. I traced a 4 inch circle and cut it out carefully with a craft knife. I adhered a 10 x 10 inch white cardstock - previously sewing the edge with my sewing machine - to a 12 x 12 inch white cardstock. On top of that comes the sewn patterned square. Around the cut out circle I glued the various super beautiful embellishments from Emma - combined with June and Aspen - with 3D foam. I glued my photo into one of the cute Emma Chipboard Bookplates. My typewritten journaling is placed in the center of the circle. Below the patterned cardstock I made my title with Emma Die Cut shapes.
I hope you like my version of the sketch. I am already very excited to see how my Team Mates have done the sketch.
Have a creative time! See you soon, Kerstin xx

SUPPLIES: Emma Kit | Emma Paper Pack | Emma Die Cut Shapes | Emma Vellum Ampersands | Emma Chipboard Bookplates & Brads | Emma Chipboard Word Confetti | Kayla Paper Pack | June Puffy Stickers | Aspen Sticker Sheet
Our final share today comes from Desiree Lamar. Let's see how she altered the sketch to suit her notebook...

Hi friends! It was pretty easy to convert this sketch to an A5 notebook spread. I decided to use photos and tags to make the grid. It was a great opportunity to use the 12x12 cut-a-part "Tags" paper. I used the top tag for typed journaling and the bottom, right tag for my title cluster. I loved embellishing all the tags and photos. The results of this sketch were just perfect. Thank you for the sketch inspo Sheree!
 SUPPLIES: Emma Kit | Emma Paper Pack | Emma Die Cut Shapes | Emma Vellum Ampersands | Julia Epoxy Dot Stickers | A5 Notebook - Katherine
Don't you just love seeing how different each project turns out? That's what I love about working with sketches! We hope we've inspired you to try the sketch too. You can share your projects with us by using #fjsketchchallenge on Instagram or by posting on our FJ Facebook Page. We can't wait to see what you come up with!
Thanks so much for joining us on the blog today!
Sheree x
