June 2022 Sketch Challenge | Creative Team
Hello friends!
Are you ready for a fresh, new sketch challenge? Our June sketch lets you play around with all sorts of die cuts, bows, labels and photos and we hope you'll have some fun with it! Let's take a look at the design I've come up with for this month...

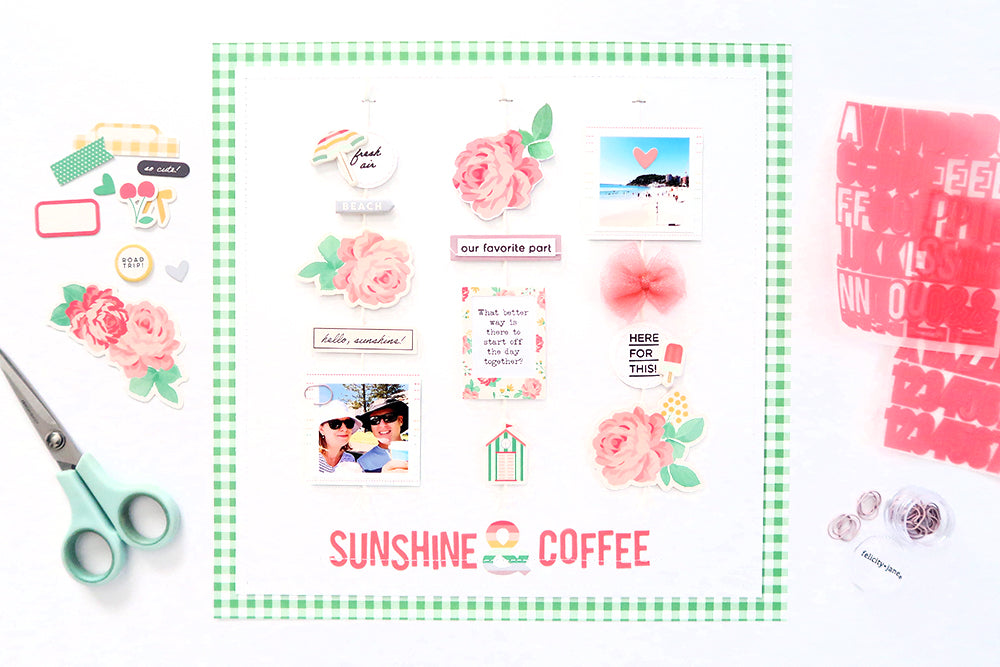
Of course, I absolutely had to use the beautiful Kayla Kit for my layout with all of it's lovely fresh colours and elements! Here is what I came up with...

I chose to give my layout a border with the pretty green gingham paper from the Kayla Paper Pack. I cut my white cardstock to 11” x 11” and stitched a white border then set about making my three strings of embellishments.
I cut three lengths of white twine and attached them to the white cardstock with a staple at the top of each, then I chose a mix of Kayla Die Cut Shapes, a fussy-cut floral, Kayla Chipboard Bits and stamped cardstock pieces.
The twine was adhered into place as I added each element to the strings. I used foam tape behind each of the pieces to add dimension. My two photos were sized to 1.75” square and I backed them with the “Dash” paper. I used the floral die cut frame for my printed journaling.
For my title I used the pretty Essentials Vellum Alphabet Stickers and the colourful ampersand die cut from the Kayla Die Cut Shapes pack and finished off by stitching across it which helped to add some lovely texture.
SUPPLIES: Kayla Kit | Kayla Paper Pack | Kayla Die Cut Shapes | Kayla Chipboard Bits | Kayla Stamp Set | Essentials Vellum Alphabet Stickers - Peony | Essentials Miniwide Paper Clips – Grape | Hannah Tulle Bows | 12 x 12 Essentials White Cardstock
As always the fabulous creative team have been busy creating their own versions of the sketch and I'm excited to share them with you. First up we have Elena Martinelli to show us the beautiful page she has created...

Hello my FJ friends! Another awesome sketch challenge today and I can't wait to share my layout with you! Sheree really came through this month! I dedicated this layout to my passion for a coffee as you can see :D
For my inspiration I started with "Dash & Retro" paper 12"x12" and with a punch I made three holes where I inserted an eyelet and twine.
Having built the base, I started to choose the embellishments and two Photo Frame Pockets to contain the pictures. In the middle, I put one of the Journaling Tags to keep a little message and I finished with some circles made with the 12"x12" paper pack.
I stamped all labels and tags with the Kayla Stamp Set and put my big sentiment.
Finally to give more contrast over my layout I created a frame with a solid colored paper with the exclusive FJ scallop branding strips.
We can't wait to see your inspirations!
Elena
 SUPPLIES: Kayla Kit | Kayla Paper Pack | Kayla Die Cut Shapes | Kayla Chipboard Bits | Kayla Journaling Tag Stack | Essentials Vellum Alphabet Stickers - Peony | Kayla Stamp Set | Abigail Bows & Buttons
Next we have a gorgeous layout by Kerstin Scheidler. Here she is to tell us all about it...

Hello Kerstin here! It's Sketch Challenge time again! I saw the wonderful sketch of Sheree and had to make it straight away! I have done this sketch (almost) 1:1. For my 9 x 12 inches layout I used the beautiful Kayla and some of my favorite bits and pieces from other collections. You know, all Felicity Jane collections can be combined wonderfully with each other!
I taped the amazing Margot Washi Tape on paper first, cut out the strips and arranged and glued them to my white cardstock according to the sketch. I started with the middle strip. On top I glued one of the cute Kayla Cardstock Photo Frame Pockets. I slid one of the adorable Kayla Journaling Cards into this frame and arranged my photos on it. The right photo has the journaling hidden behind it. On two of the Essentials Label Stickers No 2 I stamped with the fantastic Kayla Stamp Set. I'm looking forward to using this stamp set for my summer dreams. For this layout, I made buttons myself from 1 inch circles. You will see them at the beginning of each strip. I must confess I am absolutely vacation ready. You can see that in my title - made with the Aspen Puffy Alphabet.
For the rest of the decoration I just let myself be guided by my mood. See for yourself!
Let yourself be inspired! I look forward to your projects! See you soon!
 SUPPLIES: Kayla Kit | Kayla Paper Pack | Kayla Stamp Set | Kayla Die Cut Shapes | Kayla Cardstock Photo Frame Pockets | Kayla Journaling Cards | Abigail Chipboard Stickers | Abigail Flexible Epoxy Dots | June Puffy Stickers | Mari Layered Vellum Butterflies | Mari Chipboard Shapes | Aspen Puffy Alphabet Stickers | Margot Washi Tape | Essentials Label Stickers No. 2 - Taylor | 12 x 12 Essentials White Cardstock
Now we have Valeska Guimaraes here to share what she has come up using the sketch as her inspiration...
 Hello FJ friends,
Another sketch challenge has arrived and it couldn’t be more different, a lot of inspiration for you. This time Sheree prepared something super original and cool. I don’t usually change almost anything from the design she does, but this time I took a 90 degrees turn in the sketching.
I loved the rows of elements and photos, in my take of of the sketch, I used a cotton cord and turned it in loops a few times, I didn't leave it straight! I used the black dot paper as a base, and made some torn fringes on the bottom edge in shades of green finishing in my light blue paper. I was inspired by sea waves.
On top of the cotton cord, I glued die cut shapes from the Kayla, Abigail and Mari collections. In addition I made paper rolls with the strip of colored papers. The colored paper rolls gave more dimension and color to my rows of elements.
I separated two photos that complete each other and cut them into squares. I used a stapler to fix the cord on both sides of my paper and fussy cut some flowers from my floral paper, ending on the lower fringes. In the final touch, I glued the flags, hearts and my title with the vellum alphabet from the Kayla kit.
Hope you enjoy my inspiration and don’t forget to share yours with us!
xx Valeska  SUPPLIES: Kayla Kit | Kayla Paper Pack | Kayla Die Cut Shapes | Kayla Chipboard Bits | Essentials Vellum Alphabet Stickers - Peony | Kayla Stamp Set | Mari Die Cut Shapes | Abigail Die Cut Shapes
Karlla Dauer has also put together a pretty page to share with us.

I love adding dimension to my projects. In addition to highlighting them with several layers with foam tape, I chose to bring these circles with several prints of the INCREDIBLE Kayla.
I cut circles of two different sizes and machine sewed them in the center. I left the loose edges to make this beautiful effect in the layout.
 SUPPLIES: Kayla Kit | Kayla Paper Pack | Kayla Die Cut Shapes | Kayla Chipboard Bits | Kayla Stamp Set | Essentials Miniwide Paper Clips - Grape | Krystal Puffy Alphabet Stickers
Our final share today comes from Ulrike Dold. Let's see how she chose to put her own spin on her lovely project...

I am loving string layouts and so I immediately fell in love with the beautiful sketch of my talented team mate Sheree. In the last time I scrapped more in smaller formats and so I’ve decided to make a page for my "My Memories Notebook" from Felicity Jane.
First I cut the Kayla "Floral & Dot" Paper to 9.5 x 7.5 inches and made a frame with 1.5 inch wide so I could save some of my favorite paper! I cut my white cardstock to 8 3/4 x 6 3/4 inches and glued it on my frame. Then I punched two holes on the top of my page and set blue eyelets there. The position of the holes are 2.5 inches from the outside (border of white cardstock).
Then I cut one of my pictures 2 1/4 x 2 1/4 inches and glued it on a little bit bigger square from the Kayla "Dash & Retro" paper. Then I added the grape miniwide paper clip on the top of my picture. I framed my second picture with the floral Kayla Die Cut Frame. Then I cut two black ribbons to embellish them. I began on the bottom with the big picture on the left side and the die cut rose on the right side. Then I added the yellow Kayla tab on the left side of the picture and added a Shay Puffy Word Sticker and the ice cream chipboard bit there. I glued both parts on my page and fixed the ribbons with washi tape on the back of my page.
Then I added the title with the pretty Kayla Vellum Alphabet in Peony on the bottom and added a part of my title with some handwriting. I also made a line with my ruler for it. I began to decorate both strings with labels and Kayla Chipboard Bits and Die Cut Shapes. Often I’ve used 3D dots to add more dimension. I used the FJ Roller Date Stamp to add the date on a yellow Annie Essentials Label and added it on the right string. I also added the place where the pictures were taken on other labels by hand and added them on the strings.
At the end I splattered black ink across my page and added some lilac liquid enamel dots from my stash. I added Megan Puffy Stickers and the cute Kayla mini heart die cuts here and there. I used my mini stapler and fixed the white cardstock with the dotted paper on the left side on the bottom and on the right side on the top.
I hope you like my page and I could inspire you to make a "My Memories Notebook" layout with this sketch and the Kayla collection.
xx Ulli SUPPLIES: Kayla Kit | Kayla Paper Pack | Kayla Die Cut Shapes | Kayla Chipboard Bits | Essentials Vellum Alphabet Stickers - Peony | Essentials Miniwide Paper Clips - Grape | Megan Puffy Stickers | Shay Puffy Word Stickers | Essentials Label Stickers No.5 - Annie | FJ Roller Date Stamp | My Memories Notebook - Black Stripe
We hope you've enjoyed this sketch inspiration today and that you might like to try the sketch for yourself. We would love to see what you come up with! You can share it with us either on the Felicity Jane Facebook Page or on Instagram using #fjsketch challenge.
Thank you for stopping by today! Have a happy, creative day!
Sheree x
