Love Layout with a Hidden Love Letter | Kathleen Graumüller
Hey there, it’s Kathleen here again, and if you’ve been following me for a while or seen some of my projects, you might know that I am a big fan of hidden journaling. Well, for today’s layout I decided to go big and do more than just a small tag slid behind the photo or something like that. But we will get to that part in a second ;)


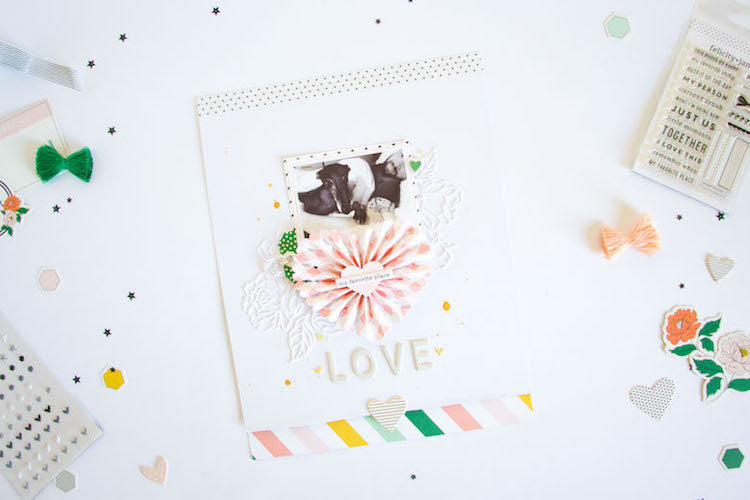
Let’s first have a look at the obvious parts of the layout. The most prominent element for sure is that super cute rosette heart that I added right in the center of my page and below my photo. I had made this rosette heart with a paper from the Henley kit quite a while ago (using a cut file from the Silhouette store), but somehow didn’t get around to using it. I always wanted to use it for something special, but didn’t really find the right project or place for it - until now.
This photo of my husband and our dog is one of my favorite ones of the two of them because first of all, it shows them cuddling, which is one of our favorite activities and secondly, because it was taken while we were in our favorite place on earth: Barcelona. So lots of favorites in this one photo ;)


Because the heart was already such a dominant element on this layout, I didn’t want to overdo it with the embellishing, but of course I had to add a little something. The flocked stickers from the Jeana kit were actually perfect for that because the white on white doesn’t make the layout too busy but still adds some interest and detail to the background and makes the photo cluster stand out more.
I also added some more small embellishments around the page to add some pops of color and just some more details, like the green tag to the left of my photo from the die cuts set, the green heart and the “my favorite place“ sticker from the puffy stickers sheet.
For my title I kept it simple and used the Jeana chipboard alpha stickers to spell “LOVE“ and added two small, yellow puffy hearts from the Brooke Bitty Puffy Stickers.
Now you might be wondering, “where is the hidden journaling?!“. Well, the chipboard heart on the bottom of the page actually serves as a lever to lift up the upper page and reveal another sheet of cardstock beneath. To hold the two pages together I simply used the tiny dot washi tape to connect them.

On the page below I also added a strip of one of the patterned papers from the Jeana kit to a) repeat the colors that you can find in the upper page and b) to fill the space on the bottom of the lower page since I had to cut the upper one a little bit shorter so that it would accommodate the chipboard heart.
I also cut out the “You & Me“ from a piece of white cardstock with my electronic die cutting machine and added this to the bottom page. In the upper part of that bottom page I used my typewriter to add my hidden journaling about how much I love being and traveling with these two and how being with them is just “my favorite place“ to be ;)
I really hope you enjoyed today’s project and that this version of hidden journaling inspires you to maybe try it out, too. Thanks so much for stopping by!
xo, Kathleen
Products used: Jeana Kit | Jeana Paper Pack | Jeana Grey Chipboard Alphabet Stickers | Jeana Die Cut Shapes | Jeana Puffy Stickers | Jeana Flocked Stickers | Jeana Chipboard Hearts | Henley Paper Pack | Brooke Bitty Puffy Shapes | Essentials Washi Tape Tiny Dot
