Millie Kit Stamped Cards | Sheree Forcier
Hello crafty friends!
Today I have some stamping and cardmaking fun to share with you featuring the beautiful Millie Kit stamp set. I can’t get enough of these stamps and they are just perfect for creating cards for the ones you love!

I’ve really been enjoying playing with my coloured inks lately and I was excited to see the cute layering heart stamps in the set. I chose five of my favourite coloured inks, then I got busy stamping up a whole bunch of pretty hearts along with a few of the other fun images

Most of the hearts I kept with solid plain colour but I selected four of the hearts and stamped the fun dotty and plus sign hearts over the top using the same colours. I love how these turned out!
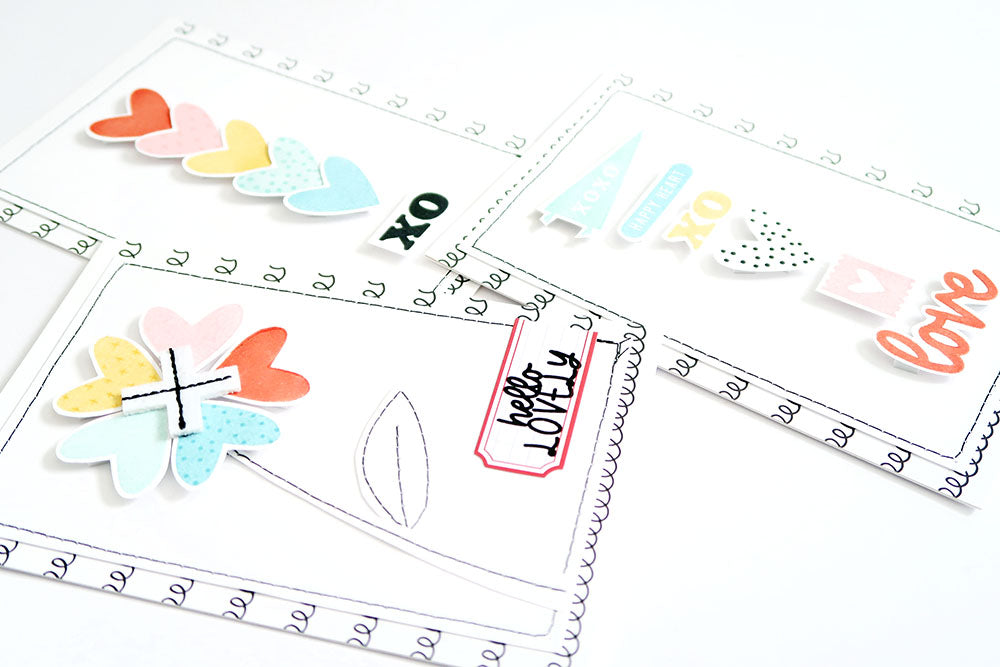
I cut some Essentials White Cardstock to 3.5 x 5.5 inches three times for the background of my card fronts. I stitched around each one with my sewing machine and black thread, then backed each one with a 4 x 6 inch piece of the Millie Kit “Swirls” paper. This gave each card front a fun black and white border.

It was then time to start with the decorating…the best part! For this first card front I arranged the pennant, the “Happy Heart” phrase, the “XO”, the heart ticket and “love” word down the middle. I also added a touch more black and white by adding a dotty heart into the mix.

I used foam adhesive behind each piece to give some lovely dimension.

For this next card I decided to use the coloured hearts to create a flower on the card front. I took a piece of white cardstock, stitched a curved line for the stem and a leaf shape, then cut out each one ready to use. I arranged the hearts, stem and leaf on the card front before adhering them all into place.

I used foam adhesive behind the hearts to add dimension, then used strong double sided tape to adhere the felt "X" piece to the flower centre. To finish off I stamped “hello lovely” onto a label sticker and adhered it to the bottom right of the card front, folding the excess label around to the back.

This last card was simple but I love the effect! I simply lined up the hearts down the middle, slightly overlapping them as I went and added “XO” stamped in black at the bottom.

Again, I used foam adhesive to secure them all into place.
Once the card fronts were complete I adhered them to the front of some white 4 x 6 inch cards that I made out of cardstock.
Check out the video below if you'd like to watch my process...
These cards were so fun to make and I love how they turned out! I hope I’ve inspired to you get your coloured inks out and get into some cardmaking too!

Thanks so much for joining me on the blog today! Happy Thursday!
Sheree x

SUPPLIES: Millie Paper Pack | Millie Stamp Set | Millie Felt Shapes | Essentials Label Stickers No. 4 – Millie | 6x6 Essentials White Cardstock | 12 x 12 Essentials White Cardstock
