Note to Self: 30 Things I Know to be True | Tiffany Julia
Hello everyone!
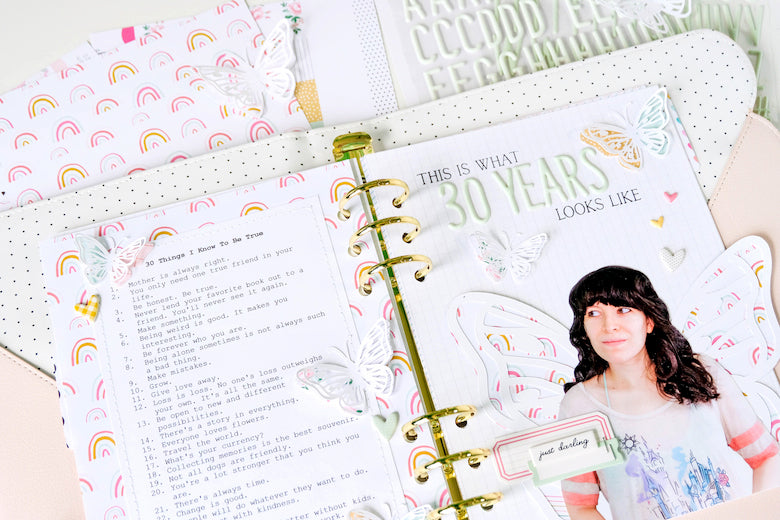
Tiffany here sharing my very first team project! April is my birthday month and I've officially lived through three decades, which is so totally insane! Though, with everything going on in the world right now, I feel completely grateful. I decided to write a list of "30 things I know to be true." Basically a list of things I've learned throughout my thirty years that I hold as personal truths. These are all little things I've learned either through experience or from someone, who taught me a very profound lesson of sorts. Not everyone might agree with me on these "truths," but for me they are true.

I created a spread in my blush scalloped Note to Self binder. I used a photo that I fussy cut myself out of, kind of like how you'd cut out images from a magazine. I did this because I wanted to give myself some wings. For the wings, I used the butterfly cut file that coordinates with the Megan kit, and backed it with some pattern paper. I ended up resizing that cut file to a variety of sizes so that I could have a few butterflies popping up in different places on my spread.

For the smaller butterflies, I backed them using the branding paper you get with each paper pack, making sure two of the patterns showed through the die cuts. I like how I can use that branding paper to incorporate a bunch of different patterns on this spread all at once.
When I had all of my butterflies backed with paper, I began working on the left hand page. This page is very simple. I typed my list on white cardstock then matted it on that gorgeous rainbow pattern paper. I love that paper! It's so fun and whimsical. I added a white stitched border around my journaling, then embellished the page with a few of the butterflies and the chipboard hearts from the kit.

For the right hand side, I created the main focal point: me with wings. I backed the large butterfly die cut with more of that rainbow paper, then cut the entire thing in half so that I could better position the wings on my back. I did end up cutting off the antennas from the butterfly in order to do so. Once I had my wings positioned where I wanted, I layered up a few of the labels from the die cut pack, stapled them together, then added the "just darling" chipboard piece on top.

For my title, I decided to use the "This is What ____ Looks Like" stamp from the stamp set. I thought it was fitting as it allowed me to put anything I wanted in that space between the words. I went with "30 Years," which I spelled out using the mint puffy alphabet stickers. Once I had my title in place, I added two butterflies around it, along with another chipboard heart and a few puffy hearts from the Brooke kit that matched.
Definitely check out the entire process below to get a better idea at how this spread came together. I hope this gives you an idea on how to use some of the Felicity Jane Cut files in your projects.
xxx Tiffany

SUPPLIES: Grace Kit | Grace Paper Pack | Grace Mint Puffy Alphabet Stickers | Grace Stamp Set | Grace Chipboard Bits | Grace Die Cut Shapes | Megan Cut File | Brooke Puffy Shapes | Note to Self Binder Blush Scallop
