Noumea | Mandy Melville
Hi everyone!
Mandy here today to share a traveler's notebook spread that I created using the absolutely beautiful 'Summer' kit! I love everything about this kit... the colours, the florals, the travel themed embellishments... it is definitely one of my all time faves! And how fantastic that it includes a beautiful Felicity Jane traveler's notebook insert!
With all of the travel themed embellishments, I knew that the 'Summer' kit would be perfect for documenting a photo from the cruise that we took last year in my traveler's notebook!

One of the islands that we stopped at on our cruise was Noumea. Unfortunately it was raining on the day that we visited, but we still enjoyed exploring, and made the mos of our day there!

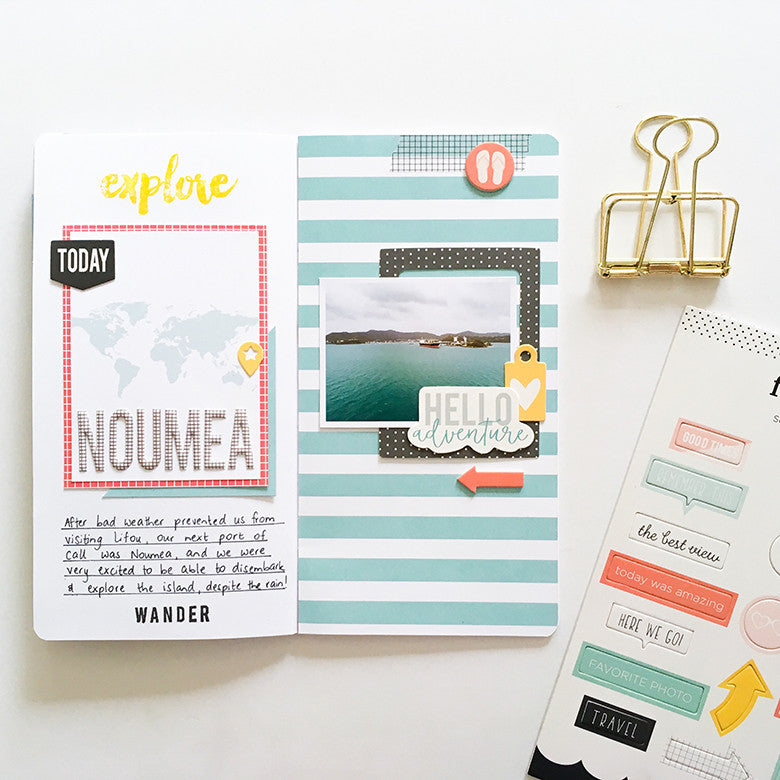
On the left hand side of the spread, I adhered the 3x4 journaling card that has the map of the world on it, and I matted it with the dark coral grid patterned paper. I added my title straight onto the journaling card using the beautiful puffy alphabet stickers from the kit. Next I added a couple of the die cut shapes, including the 'today' tab, and the geo marker which is pointing to where Noumea is on the map.

I also added my journaling to the left hand side of the spread, and finished the page off by stamping the word 'explore' at the top of the page in yellow ink, and 'wander' at the bottom of the page in black ink. How awesome is the 'Summer' stamp set for documenting vacation pics!

I covered the right hand side of the spread with the aqua stripe patterned paper, and then added a strip of the grey grid washi tape at the top of the page, as well as a chipboard sticker.

I LOVE the die cut shapes in this kit, and I used a few of them to embellish around my photo. First I tucked the black frame behind my photo, and then I layered a couple of the die cuts on the bottom right hand corner of the photo. Lastly I added a chipboard arrow underneath the photo.
Thanks so much for joining me on the blog today, and I hope that I've inspired you to create a page in your traveler's notebook, if you haven't already! I'll be back next week with another project to share with you using the beautiful 'Summer' kit!
Mandy x
Supplies Used: 'Summer' kit | Summer Paper Add-On | Summer Journaling Cards | Summer Die Cut Shapes | Summer Chipboard Stickers | Summer Puffy Alphabet Stickers | Summer Grid Washi Tape | Summer Stamp Set | Traveler's Notebook Insert