Off the Page | Pocket Page Layout by Marybeth
 Hi, everyone! I'm back this week to share a couple pocket pages I made for my Project Life album. If you know me at all, you'll know that I can't seem to stick with just one type of memory keeping for too long. In fact, I think I do my best when I switch up the shapes & sizes & styles of my books as often as possible. :) And this week, I'm really enjoying cutting up the beautiful papers in these kits to fit in page protectors.
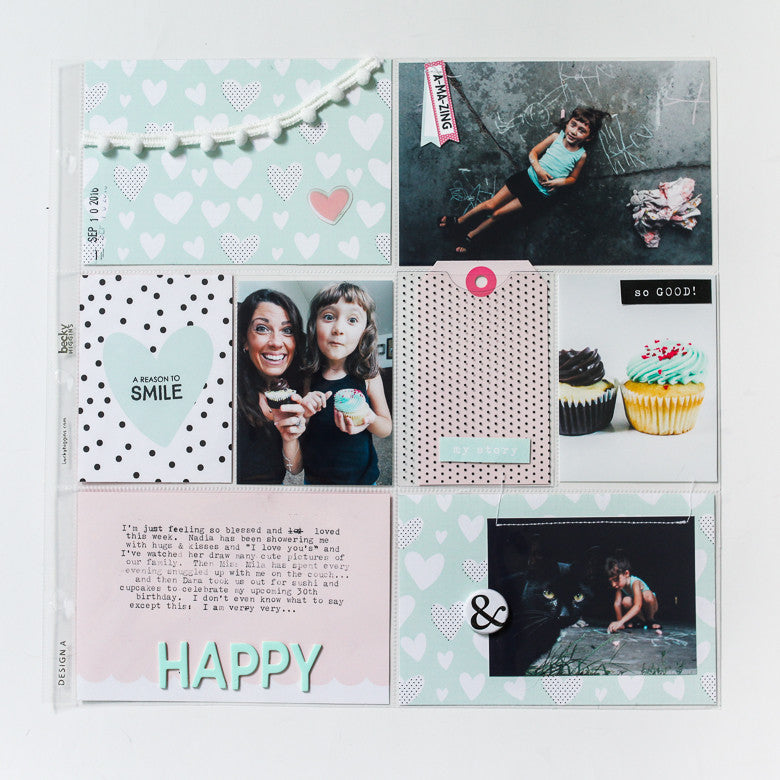
First up is the one I created using this month's "Felicity" Kit... that I'm in l-o-o-o-o-ve with, by the way! For this layout, I was inspired by all the blues and blacks I had going on in my photos this week.
I think the light mint paper mixed with the little pops of pink worked really wonderfully. The banners that I stitched to the photo below are from the cut files we received this month. I simply resized them a little smaller before cutting them out with my Silhouette, and then I stamped right on top of the pink one.

I also used the stamp set from this month to add "A Reason To Smile" in the center of that adorable journaling card.

Another thing I love about this month's kit is the acetate pack of goodies. This black polka dot piece with the thumb notch was just too cute to not immediately use! It was a tiny bit larger than the pocket, so I trimmed down the side a bit (and saved the little strip of dots to use later!), and then I tucked a homemade tag behind it- I haven't journaled on it quite yet because, well, I don't always like how my handwriting looks, so share it on the Felicity Jane blog?? No thank you!! ;)


I used the alpha set to write the word "Happy" on the outside of the page protector, and then I took the 4x6 paper to my typewriter to share some thoughts... Not without making a few mistakes, though. See? Eh, I don't mind.
And naturally, it wouldn't be a page by me if there wasn't some sort of cat involved, right? ;)

I just sewed that smaller image to the paper, popped a flair button on the outside, and it's done!
Can I show you just one more page?? This is one I made using the Maggie Kit.
These colors are just so calming, aren't they?

For this layout, I cut the beautiful woodgrain + light blue & white paper that came in the kit so it would line up nicely behind the 4x4 pockets in the page protectors. Then I cut off the black and white polka dot branding strip at the bottom and added it to some of the cards.

One thing I love about the pocket page layouts I create is that I tend to always add some embellishments on top of the page protector. I just think it's more fun to put them on the outside, don't you?

How many of you look at the packaging when you receive your kit and think, "How can I use all this gorgeous crinkly white stuffing in my projects?" (Seriously, I just think our kits come packaged SO beautifully!) When I was making this, I got the idea to create a "shaker pocket" of sorts using some of the packaging material as well as the tissue paper confetti circles that came in the kit, too. Fun, right?
And, once again, I used my 1960s typewriter to do some journaling on the cards. This time without making any mistakes. ;)

And that's it! I enjoyed making these immensely, so I'm sure there will be more pocket page layouts to come! Thanks so much for looking!! XOXO
Supplies used: Felicity Kit | Acetate Shapes | Chipboard Alphabet | Felicity Stamp Set | Maggie Kit | Silicone Charms | Stamp Set

2 comments
So beautiful and fun pages!!! The FJ kits are so pretty and with wounderful colors and you use of them are really creative!
Love the results. Beautiful inspiration! Thank you so much for sharing.