Oh Girl Layout | Ulrike Dold
Hi there, it´s Ulli here today and I have new layout to share with you. This week´s theme is stamping and it was such a great challenge for me. I love stamping, but often I stamp only a little bit (some phrases or words and small motifs) on my projects and mostly with black ink. For this layout I've stamped a bunch of brushstrokes and butterflies from the gorgeous Brie Stamp Set in many different colors.

I started by choosing a photo and found this black and white photo from our daughter. It has to be very hard to be a 3 year old girl - she likes sulk often and so I decided I should have to document this part in her current life. Then I searched for all the ink colors to match the colors from the Brie Kit. The colors from the Brie Kit are so wonderful and bright and I've chosen nine different colors in yellow, coral, pink, blue and green.
The first thing I tried was a stamped circle of butterflies in all these different colors, but it wasn't working and I decided to start over. My second idea was to create a layout with a horizontal color transition from yellow to green with the brushstroke stamps and the butterflies. I always love rainbow colors on layouts and they always turn out amazing.
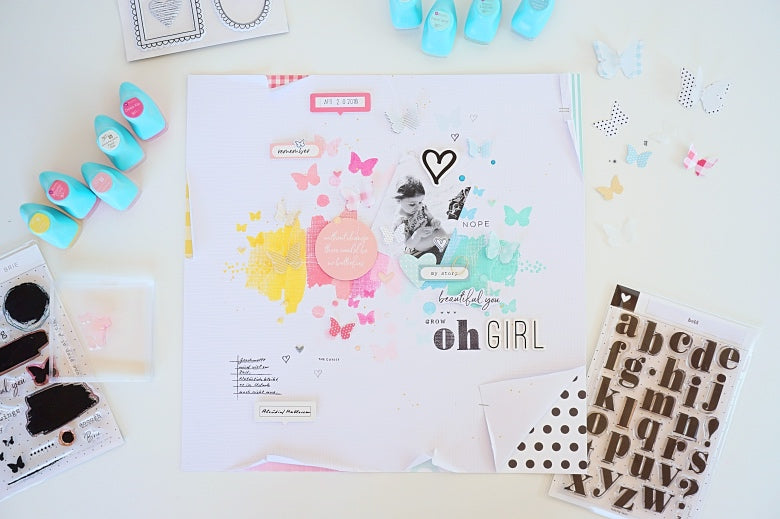
I started with my background arrangement and stamped the two big different brushstroke stamps, the small brushstroke dot stamp and the two different butterfly stamps from the Brie Kit on my layout. First I stamped the brushstroke stamps in the middle of the 12x12 cardstock and then I stamped the butterflies and the brushstroke dot under and above this line. I began with the color yellow on the left side and ended up with the color green on the right side of my layout. The little dot stamp on the beginning and the end of the rainbow is from the Chloe Stamp Set.
![]()
I also stamped the journaling lines from the Chloe stamp set on the bottom left of my layout - for that I used a black ink pad. Then I glued my photo on the layout and searched for matching embellishments to decorate my stamped rainbow. I used some of the amazing and cute layered butterflies and stitched them with my sewing machine and white thread. I punched out a butterfly from the raindrop paper from the Brooke Kit and also one from a sheet of white vellum. I also stitched them together on my page for the green.

The Brie Die Cut circle "Without change there would be no butterflies" was perfect as an embellishment in pink and the phrase matches perfectly to my photo too. Then I glued some tags from the Brie Die Cut Shapes (Remember, My Story) in pink and in blue on my layout. I fixed a mini gold clip on the blue tag. Then I stamped the date with a roller date stamp on a little piece of paper, cut it out and glued it on the empty tag in pink.

I stamped some little stamps across the page. I used the Henley Stamp "Grow“\" and the little heart from the Brie Stamp Set. I've also used the word "Nope" from the Brooke Stamps and the tiny hearts and the phrase, "The cutest" from the Zoey Stamps. Then I decorated the rainbow on my layout with some Henley Epoxy Dots and Brooke Puffy Shapes in yellow, pink, blue and mint.

I decided to decorate my photo with black and white embellishments and so I've used the puffy shapes and a die cut heart from the Brie Kit for it. I also stitched a black and white layered butterfly on my photo and one above it, and I've used some white epoxy dots too.

I love to use alphabet stamps and alphabet stickers combined for a title and so I mixed them up on this layout. I used the Bold stamp set for the word "Oh" and the Reagan Chipboard Alphabet for the word "Girl".

The phrase from the Brie Stamp, "Beautiful you" is so pretty and so I stamped it on a piece of paper and cut it out to glue it later with foam pads above my title. With this technique you can make your own unique die cut shapes and its so easy.

I used a white tag and noted the place where the photo was taken with a black fine liner on it. Then I folded the right edge at the bottom from the layout and used my stapler to fix it. I glued the Brie Journaling Card with the big polka dots under it. I tore the paper border around my layout on five other places and glued some paper stripes and paper leftovers in all my stamping colors under these places. For the right edge above I also used my stapler to fix the teared paper.
Finally, I wrote my journaling on the stamped lines and splattered some gold paint across my page.
I hope I could inspire you to use the beautiful Brie stamp set or some other stamp sets from your Felicity Jane stamp collection. It is so much fun to work with them more intensely. I think I will also do this more often now.
Until the next time,
Ulli
Supplies: Brie Kit | Brie Paper Pack | Brie Stamp Set | Bold Alpha Stamp Set | Chloe Stamp Set | Reagan Chipboard Alphabet | Brie Layering Butterflies | Brie Die Cut Shapes | Brie Puffy Stickers | Brooke Bitty Puffy Stickers | Kate Epoxy Hearts | Henley Flexible Epoxy Dots | Brie Journaling Cards | Brooke Paper Pack