"Sunshine" Layout with Mix & Match Kit No. 1 | Sheree Forcier
Hi it’s Sheree here! I’m excited to share this new layout with you today using some of my favourite products!

I had so much fun picking out the goodies for this layout and we've put it all together into a kit that you can get for yourself in the Felicity Jane shop! You can find it in the 'New' section of the shop right now...it's called Mix & Match Kit No. 1.

Let’s get to it…
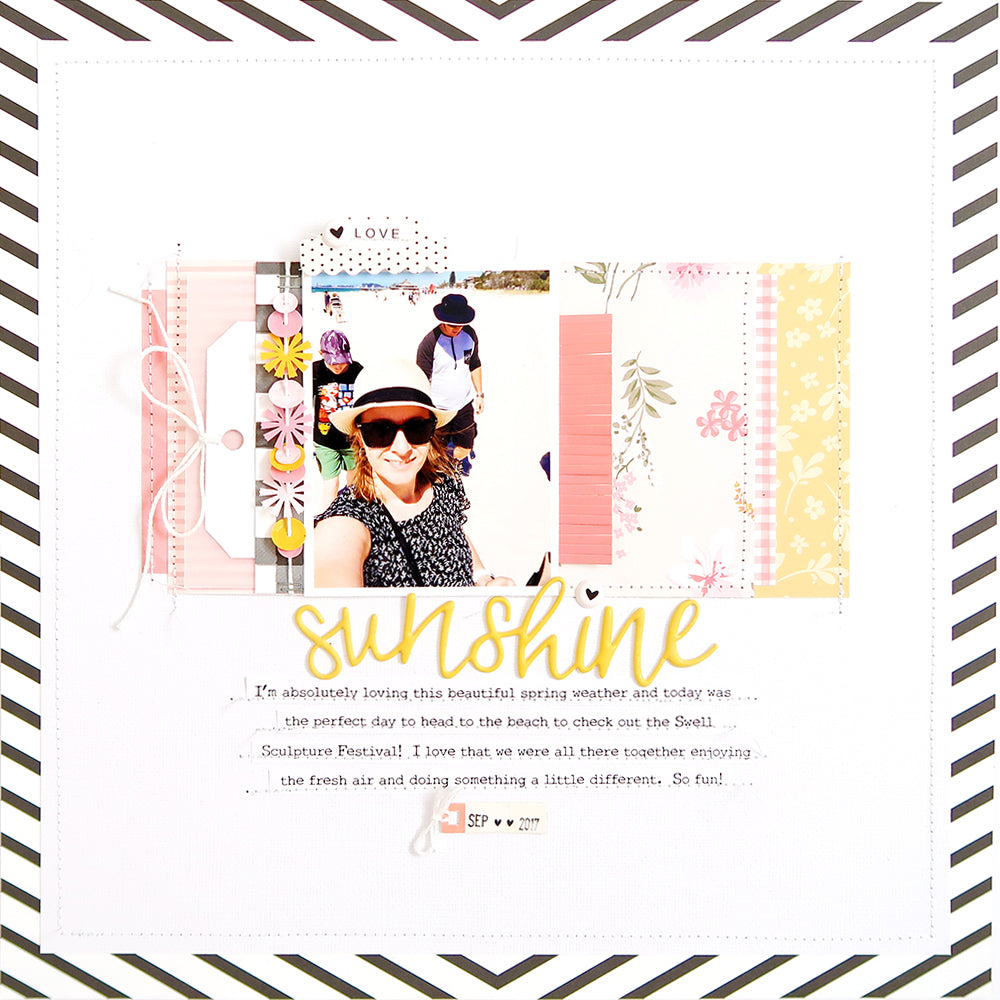
Cut some white cardstock to 11 x 11 inches and centre it onto the stripes paper background. I have also stitched a border around the white cardstock to add a little texture.

Next you’ll need to cut some patterned paper pieces from the paper pack. Here are the approximate measurements for each:
- Pink Stars Paper 4”x ½”
- Pink Stripes Paper 4”x 1 ½”
- Vellum (from your stash) 3 ¾”x 1 ½”
- Gingham Paper 4”x 3”
- Floral Paper 4”x 3”
- Pink Gingham Branding Strip (3 3/4”x 1/2”) from Paint & Stripes Paper
- Yellow Flowers Paper 4”x 2”

Now you need to layer and adhere these pieces together. I also made a little tag top using some plain white cardstock and tied some twine to the hole. I’ve layered them into two section which you can see in the photo below.

Before you adhere these two layered pieces to the page, you need to thread some of the Jenny Sequins onto a length of embroidery floss, cotton or twine. I used embroidery floss. If you have trouble threading them onto your embroidery floss you can try using a needle to help you. Once you have your sequins on your thread, go ahead and staple it to the top and bottom of the gingham strip as shown.

You can now adhere your two layered pieces to the page and add some machine stitching for added texture if you wish.

Next you can adhere a piece of Jenny Cardstock Fringe under the right side of your 4 x 3 inch photo and attach your photo to the page.

Under the photo you can now add your title. I used the word “sunshine” from the Sarah Puffy Titles pack and used a Megan Puffy Sticker to dot the ‘i’. Your journaling strips go underneath the title. I added some machine stitching to mine as well.

Stamp or write the date onto a Megan Tiny Tag and add some twine, tie a little bow and adhere the tag under your journaling. (Tip: Staz On ink is the best choice to stamp onto the slick surface of the tag.)

To finish the page off, I printed out the word “LOVE” using my computer and adhered it to a Shay tab die cut, stitched across it then added it to the top of the photo. You could also use a stamp from your stash to do this too. I adhered my tab to the photo using foam dots to add dimension.

The layout is now complete! My scrapping style is quite clean but you could always add some ink splatters to your background if you prefer.
You can see my process in the video below...
You can find this Mix & Match Kit No. 1 in the Felicity Jane store now and be sure to check out the other items new to the shop this month including the Mix & Match Kit No. 2 which has been put together by Creative Team Member Lindsey Lanning! It co-ordinates so well with this kit!

Thanks for joining me on the blog today!
Sheree x

SUPPLIES: Mix & Match Kit No. 1 | Shay Paper Pack | Shay Die Cut Shapes | Megan Tiny Tags | Megan Puffy Stickers | Sarah Puffy Title Stickers | Jenny Cardstock Fringe | Jenny Jar of Sequins | FJ Roller Date Stamp