Take 3 Challenge | Ulrike Dold
Hi FJ friends!
Today I am up on the inspiration page with our awesome "Take 3 Challenge". I’ve made the following layout with the adorable June collection with 3 things as the focus:
1. A big circular picture
2. Fussy cutting and
3. Die Cuts
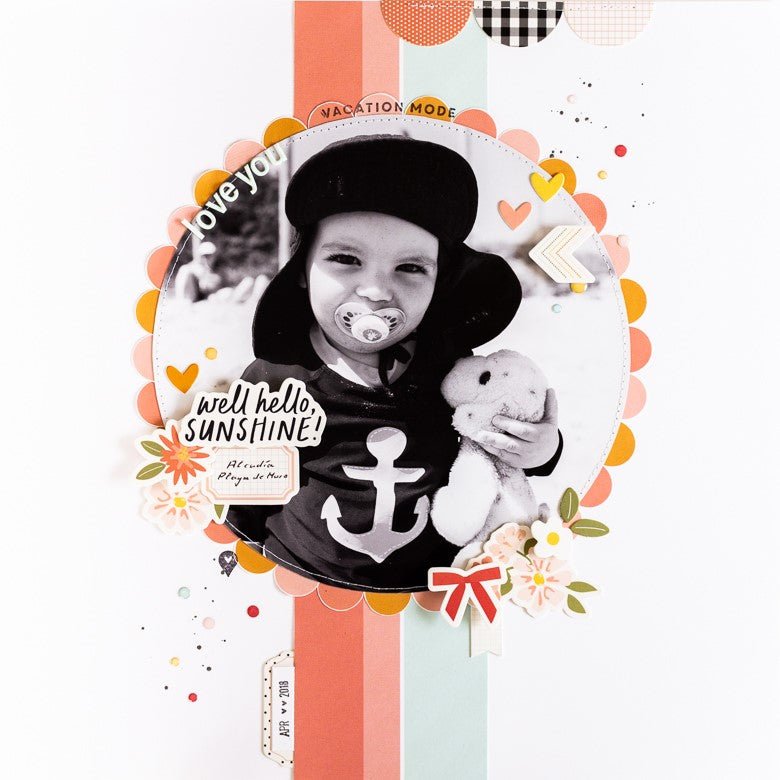
Here you can see the whole page.

Now I want to describe how this page came together.
First I cut out a circle from some paper with my electronic die cutting machine. The circle has a diameter of 7.25 Inch. Then I used it as a stencil and transferred the circle to the back of my big picture in black and white. I used my scissors to cut it out. Then I cut a paper strip of about 3 inches wide from the June "Bold & Diagonal Stripe" patterned paper from the wonderful June collection and added it on the middle of my 12x12 FJ Essentials White cardstock. I glued it vertically on my page. I added the picture in the upper third of my page too.

Then I fussy cut many of the red, pink and orange semicircles from the June "Dash Grid & Sunset" paper and glued them around the round big picture. I always used the same sequence from the colors. Then I used my sewing machine and white thread and stitched around the circle picture. I love the look of the picture with these scalloped border. It looks like a prize ribbon or something like this. What do you think?

I wanted to decorate the layout and I decided to use the super sweet die cuts as the 3rd point of my Take 3 Challenge. The sweet "Well, hello sunshine" die cut was perfect as my title and so I added it with 3D dots on the left side on my picture. I added the location where the picture was taken on the June label with the pinkish border and added it under my title. I also used the super cute flower die cuts to cluster more embellishments there.

I used the FJ Roller Date Stamp to add the date on a piece of white cardstock, cut it smaller and added it on the cute tab with the dots from the June Die Cuts. I glued it on the left side of the big paper strip near the bottom. I added the sweet red bow from the die cuts on the right side of my picture and clustered some die cut flowers there and the cute little banner die cut from the June collection. I added the three semi circle die cuts on the paper border on the top and stitched with my sewing machine over it. Then I added the die cut arrow on the right side on my picture and glued three of the die cut hearts on my page too.

I added the stamp "vacation mode" on the top of the picture and the local sign stamp under the part with the title. Then I added the words "love you" with the small June Puffy Alphabet in mint on the left side above from the round picture. At the end I splattered black ink across my page and added some of these wonderful June Epoxy Dots on the layout from the lower part of the page to the bottom and from the left side to the right.

I hope I have inspired you to set your focus on 3 things/techniques and to create a sweet FJ project with it. Have fun!
xx Ulli
SUPPLIES: June Kit | June Paper Pack | June Die Cut Shapes | June Stamp Set | June Bits & Pieces | June Puffy Alphabet Stickers | FJ Date Roller Stamp | 12 x 12 Essentials White Cardstock