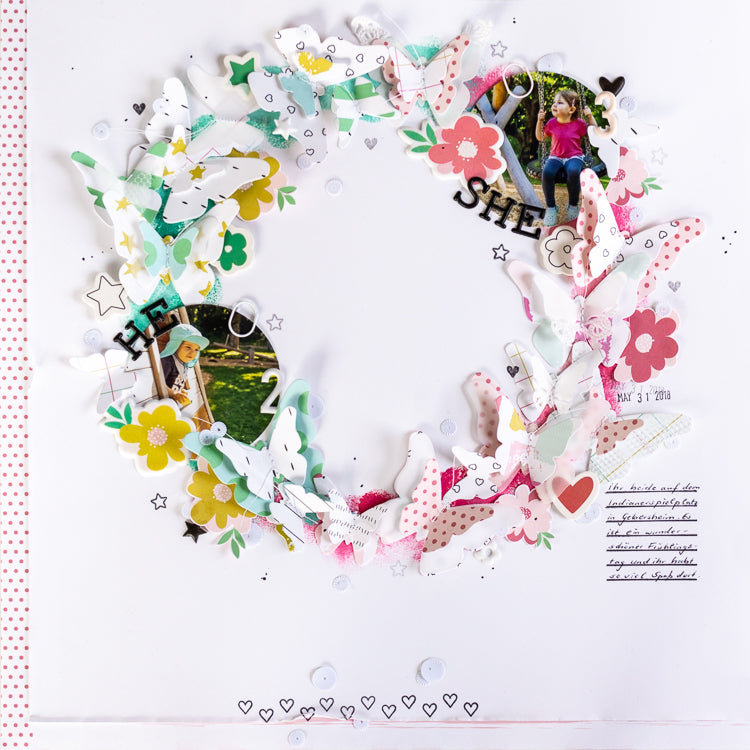
Wreath layout with layering butterflies | Ulrike Dold
Hi there, its Ulli here and I have a fresh and colorful layout inspiration with the super pretty Felicity Jane Jaimee collection for you. Finally its spring and I love it when everything blooms and awakes after winter. Working with the beautiful and colorful Jaimee collection is so much fun and for this layout I’ve used every pattern from this collection. The colors, patterns and motifs are perfect for spring and I hope you enjoy them as much as I do! I made a wreath layout with layering butterflies and a little bit mixed media for today’s blog post.

First I cut out many butterflies in 3 different sizes with my Big Shot and some butterfliy dies. Therefor I used the Jaimee papers Dots & Lines, Grid & Stars, Swatch & Zip, Lines & Spots and Spots & Hearts. I also used tulle in mint, a white vellum sheet and white doilies to cut out some butterflies with other textures too. Then I used my sewing machine and white thread and stitched two or three butterflies together. It´s so easy to make layering butterflies and I hope you will try it out. They look amazing and so cute on every kind of scrapbooking projects.

I decided to use two pictures for this layout: one of my little boy and one of my little girl and I wanted to make a circle with a boyish side in green, turquoise and mustard and a girlish side in light and dark pink. So I used some Acrylic paints in these colors and spotted a circle half green and half pink on my white 12x12 cardstock. I used a circle die to change the shape of my photos to circles too. I arranged first the photos on the left side below and the right side above and attached the cute mini wide paper clips in white and soft pink on my photos. Then I glued the layering butterflies on my circle. I also fussy cut some of the cute flowers of the Jaimee Floral & Paint patterned paper and glued them below the butterflies and my pictures. Then I glued the title (He & She) with the pretty black Jaimee Puffy Alphabet on my layout. I also added the age of them with the wonderful Essentials Puffy Stickers in Pink and White on my pictures.

I cut with my paper trimmer a 1/2 inch from the left side and a 1/2 inch from the bottom of my cardstock and glued the wonderful Jaimee Paint paper under my layout. Then I teared the paper on these paper borders a little bit with my fingers. For the journaling I used the great Jaimee stamp with the lines and stamped it on my page. I wrote my journaling by hand on the lines. With this stamp its so easy to write your journaling straight and accurate on your scrapbooking projects. And I love it because I’m a little perfectionist. ;-) Then I used the little heart and star stamp from the Jaimee collection and stamped them around the circle. To add a little eye catcher on the bottom of my layout I used the heart border stamp and stamped a little line of these cute little hearts on my layout.

To finish off my page I used black paint a splattered it sound the circle. Then I used some of these super adorable Jaimee Puffy Stickers and some of the Die cut shapes and decorated my circle with them. I continued with the boyish and the girlish side/color scheme while decorating. To give the die cut shapes some dimension I´ve used foam dots to glue them on the layout. I used the white Jaimee Sequins and glued them around the butterfly circle and on the bottom of my page and some of them on the wings of the layering butterflies.

At least I used the Felicity Date Roller Stamp to bring the date with black ink on my layout. I hope you like my Jaimee inspiration and I could inspire you with the techniques and the wonderful papers and embellishments I’ve used.
Until the next time.
xx, Ulli
Supplies:
Jaimee collection, Jaimee paper pack, Jaimee Puffy stickers, Jaimee Die Cut Shapes, Jaimee Stamp Set, Jaimee Puffy Alphabet, Jaimee Sequins, FJ Roller Date Stamp, Jill Mini Wide Paper Clip Soft Pink, Mini Wide Paper Clips White, Essentials Puffy Alphabet Pink, Essentials Puffy Alphabet White
