"You & Me" Layout | Ulrike Dold
Hi FJ friends,
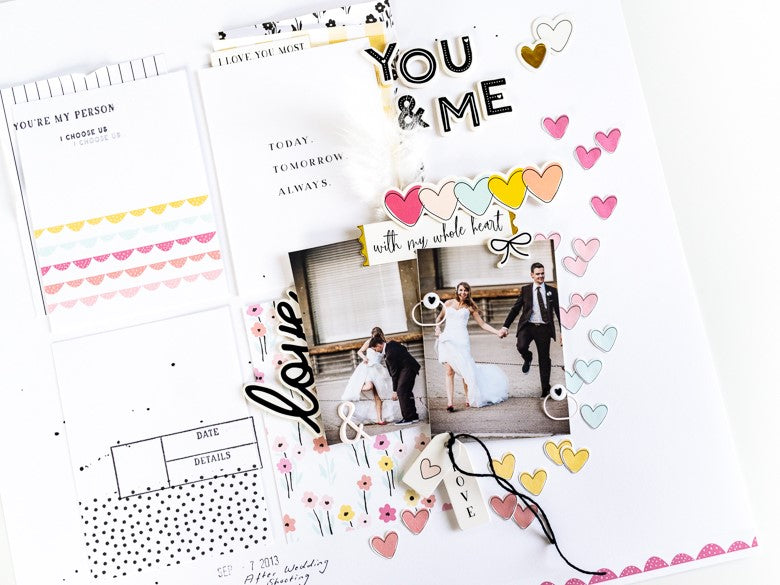
Ulli here with you today and I hope you have a great week. Today I want to share a new scrapbook page with you: a 12x12 inch layout with the gorgeous new Bailey collection. I wanted to use the love theme and the wonderful patterns and embellishments for a layout with pictures from our after wedding shoot. When I went through the journaling cards I decided to use them and to make a page with a grid design.
I cut the paper border with the pink scalloped design and glued it on the bottom of my page. Then I took four Bailey journaling cards, 2 with colors and 2 with black and white, and moved them on my page. I love these cards so much, especially the "Today. Tomorrow. Always." card and the card with the colorful scalloped borders! I decided to glue them on the left side on the page, always two cards side by side. I layered them with other Bailey journaling cards and a self made 3x4 inch card from the black and white floral design. On the journaling card with the colorful flowers I glued my two pictures with 3 D glue dots to add a little dimension. Then I fussy cut the card with the colorful hearts for a eye-catcher on my page. I used the hearts and their color gradient and glued first the yellow little hearts under my picture. Then I added the other colors against the picture upstairs. At least I glued the orange hearts under my pictures too.

I threaded two heart beads on two pinkish mini wide paper clips and added them on the left and the right side of my left photo. Aren’t the heart beads super cute!? I love them so much! Then I punched a hole into the picture and added the cute little tiny tags from the Bailey Die Cut Shapes with black twine on my picture.

I added the colorful heart die cut with five hearts in the Bailey colors and the "With my whole heart" ticket with gold foil accents with 3 D dots on the top under my picture. Then I glued a white feather behind it. Feathers are always a good idea for wedding layouts, because they are matching perfectly to white wedding gowns. Then I added the title "You & Me" with the adorable Bailey Chipboard Shapes on the right side above. I began the title on the border of the journaling cards.

I also added another chipboard sticker, the love lettering, on the left side against my left picture and an ampersand of the pinkish Bailey Puffy Alphabet on this picture. These puffy alphabet stickers are so sweet!

I stamped the "Date & Details" Stamp from the Bailey stamp set on the left journaling card below and used a date roller stamp to add the date under this card. I wrote the event, our after wedding shooting, by hand under the date too. At the end I finished my page and splattered black ink across the page and added the "Love you most" and two heart die cuts on my layout. I also used the cute little chipboard bow to add another eye catcher on my right picture with the mini wide paper clips with the heart beads.
This is the complete layout and I hope you like it.

What kind of projects do you want to make with the wonderful Bailey collection? I am always so happy when I see all your wonderful projects with Felicity Jane collections on Instagram and the Felicity Jane Facebook groups. They are so beautiful!
Thank you for stopping by today!
xx, Ulli

SUPPLIES: Bailey Kit | Bailey Paper Pack | Bailey Pinkish Puffy Alphabet Stickers | Bailey Stamp Set | Bailey Chipboard Shapes | Heart Beads | Essentials Mini Wide Paper Clips Soft Pink | Bailey Die Cut Shapes | Bailey Journaling Cards | Essentials White Cardstock
