I am still finding it so hard to believe that it is December, but that certainly didn’t stop me from decorating for Christmas. I turned on Christmas music as soon as I could, as I think I certainly needed some holiday cheer in my life after this year. Something I love doing each year is creating an ornament or two for the tree. I always make sure to include my little in making ornaments too, because it’s so special to watch them get in the holiday spirit.
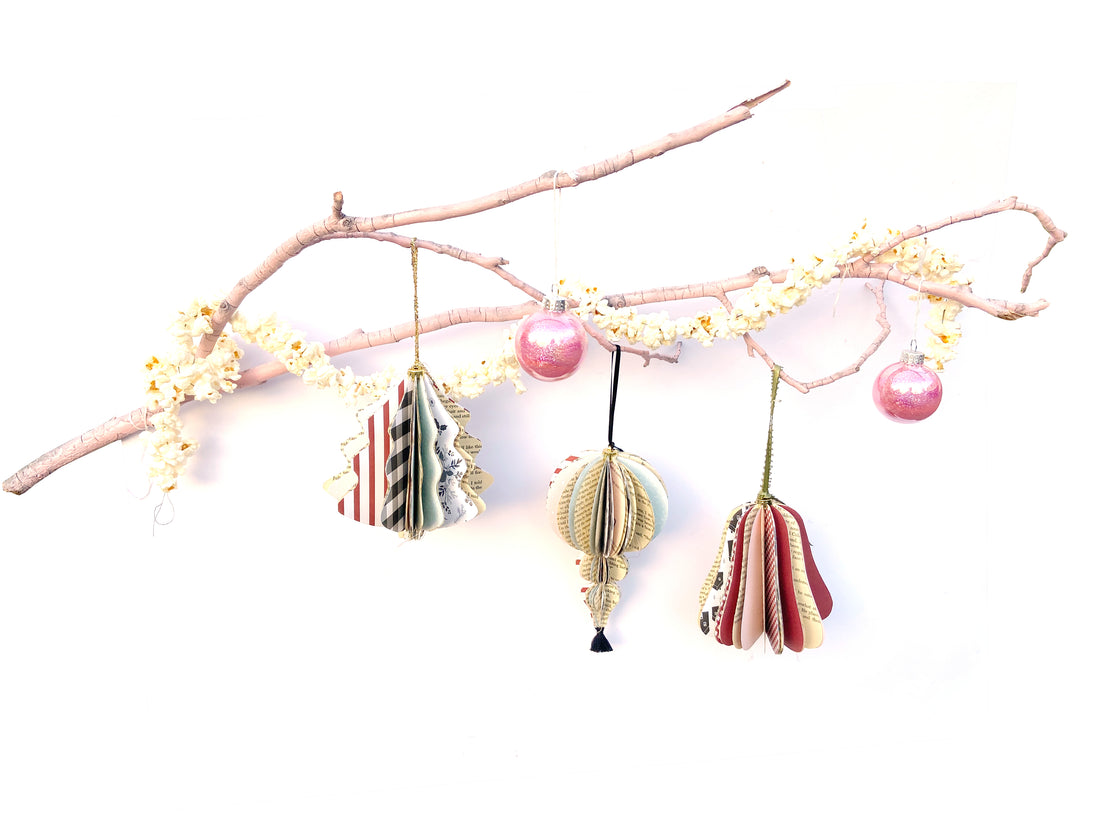
For this year’s ornaments I really wanted to incorporate some vintage book pages that were taking up space in my scrap stash. I knew those book pages would pair perfectly with the gorgeous papers in the Coco collection. I decided on three different designs for each of my ornaments. I chose a vintage shaped ornament, a tree, and a bell. I simply folded my papers in half and hand drew out my designs. I also cut each piece out with my fussy-cutting scissors by hand, but it would be just as easy to use your electronic cutting machine. I’ve made sure to include my designs for you, so it will take the guess work out it!


All you need are 8 pre-cut patterned paper designs and then 20 pre-cut book page designs. After all of these papers are cut, you can then begin to assemble. I chose to do two book pages for every patterned paper, because they are a lot thinner. I just alternated 2 book pages followed by a patterned paper piece. I then used my sewing machine to stitch through the center of each stack of papers. This becomes rather thick, so you’ll need to make sure you have a brand new, sharp needle in your sewing machine, and turn the knob instead of using it electrically. 
Once you’ve stitched down the middle of your stack of papers, you can then start fluffing your shape. I used an ornament topper to get the best separation of papers. These ornament toppers have little prongs that the papers separate into. After I arranged the papers as I’d like them among the prongs, I got out my hot glue gun and adhered the topper on each shape. Feel free to use your pva glue or a glue stick to glue the stitched pages back to front, so that you get one of the major continuous shape openings.
Now that my topper was done and my shapes were fluffed, I could go about stringing them up. I dug through my FJ textures and chose 3 pieces of thin ribbon to string up my ornaments. Seeing all three of them string up on ribbon just made me so happy. There was something so simple and pretty about the FJ papers mixed in with vintage book pages. I couldn’t get enough of them hanging with that pink branch and hand-strung popcorn garland.
I certainly hope you leave inspired to create your very own ornaments today! I had such a relaxing time cutting out each paper and making these, and I really think they’ll help you slow down a bit and relax too! There was a lot of time spent cutting each shape and stitching them together, but they were so worth the effort!

SUPPLIES: Coco Kit │ Coco Paper Pack │ Christmas Trims Grab Bag