"Love This“ Layout or How to Deal with Mistakes | Kathleen Graumüller
Hey there, it’s Kathleen again and today I want to share with you what you can do when things aren’t exactly going as you planned while making a layout ;)

First of all, before starting to work on this layout, I had already messed up another page and had come to a point where I didn’t think there was anything I could do to “fix it“ (anyone know that feeling?), so I just put it aside for another day and grabbed a shiny new blank piece of white cardstock.
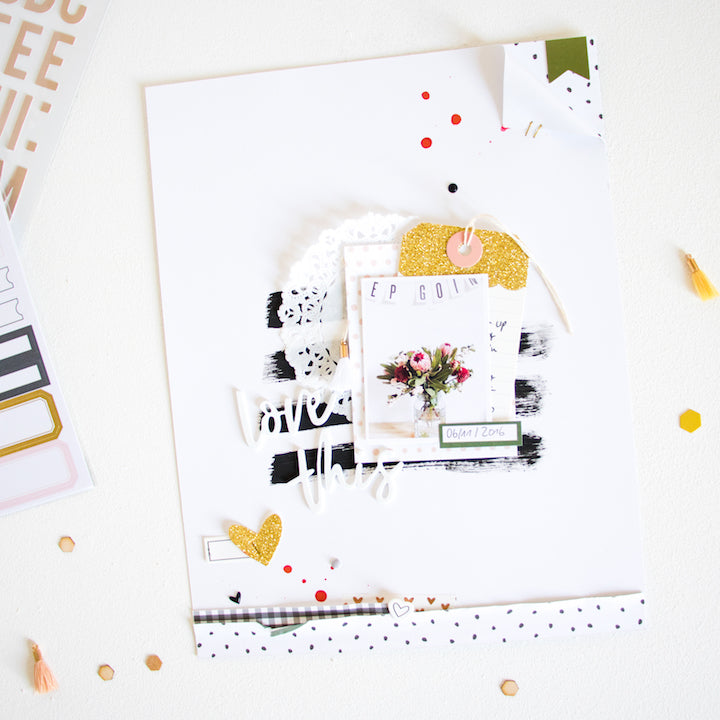
I wanted my layout to be very light and airy, so with lots of white space and not a lot of patterned paper, but still some bold element. Therefore I added those black stripes with a dry paint brush (makes for nice textured brushstrokes) and black acrylic paint behind the cluster with my photo, a doily, some paper and the tag.
Everything went well and I even waited until the acrylic paint was completely dry (I’m usually very impatient and just continue to work on my projects...which usually ends up in a mess, haha! :D Anyway, I added some more details like the folded down corner with the patterned paper peeking out from behind it, some of the puffy shapes from the Zoey kit and some Color Shine splatters.


When I was done with my page I started cleaning up my desk and that’s when it happened.. I dragged part of my shirt right through the still wet Color Shine on the bottom of my page and smeared it… that’s what you get for cleaning up, I guess ;)
Because I had already messed up that page before and I didn’t want to discard another one and start all over again, I thought about how I could fix this mistake. Or in the words of Bob Ross: "There are no mistakes, just happy little accidents“ - or translated into the scrapbooking world: There are no mistakes, just embellishment opportunities ;)

However, because that one smudge was too big to cover it up with some embellishments and the placement would be really weird, I decided to add a strip of patterned paper on the bottom of my page that would hide it and make it look like it was always meant to be that way. For the smear next to the golden heart I grabbed one of the little tags from the Mila ephemera package, cut it in half and slid it beneath the heart die cut.


Now that the page wasn’t as “airy“ as I had intended, I added a few more bits and pieces like that cute white tassel from the Heidi kit and the green flag in the top right corner. Although the layout ended up looking very different from what I had in mind when I started, I still like it! And it was a good lesson (again) to just go with it and make the best of it - even when things aren’t going as planned ;)
If you’ve read through all of this: thanks for sticking with me, haha! I hope I encouraged you to do the same next time you think you messed up a layout!
Kathleen
Supplies: October Mila Kit | Mila Paper Pack | Mila Die Cut Shapes | Mila Cardstock Label Stickers | Mila Foam Shapes | Mila Journaling Cards | Heidi Tiny Tassels

1 comment
Kathleen, you’re a crack! Absolutely love your style and how you perfectly covered that mistake! ? xo